About Me

My photo
Early childhood education has been my life for over 40 years. I have taught all age groups from infants to 5-year-olds. I was a director for five years in the 1980s, but I returned to the classroom 22 years ago. My passion is watching the ways children explore and discover their world. In the classroom, everything starts with the reciprocal relationships between adults and children and between the children themselves. With that in mind, I plan and set up activities. But that is just the beginning. What actually happens is a flow that includes my efforts to invite, respond and support children's interface with those activities and with others in the room. Oh yeh, and along the way, the children change the activities to suit their own inventiveness and creativity. Now the processes become reciprocal with the children doing the inviting, responding and supporting. Young children are the best learners and teachers. I am truly fortunate to be a part of their journey.

Tuesday, October 3, 2023

Sensory materials for the sand and water table.

Because I am often asked what materials I used in my sand and water table, I will write a series of posts about those materials.  In a way, I have already started to introduce some of those materials in my most recent posts about two of my favorite materials: sticks and rocks.

Let me backtrack with a post about one of the most elemental materials for the sensory table, namely water.  However, when I think of water, I think about how varied that material can be.

First of all, there is just plain old water that one gets from the faucet.  It was never enough for me to just have water and cups and bottles for pouring and filling.  I always felt that children would tire of that setup rather quickly.  Instead, I would add a construction to the sensory table to invite children to explore the properties of water.  For instance, one of the most dynamic apparatus was a large PVC pipe with funnels that was oriented on a slant so when the children poured water into a funnel, the water would exit the end of the pipe into a tub next to the table.


That may sound simple, but there were some serious physics going on there.  Namely, the lateral force of water poured into the pipe through the funnel carried buoyant objects out the pipe.  Of course, the children did not have words for their physics experiments, but never the less, they were gaining important knowledge about the properties of water.  Back in 2011, I wrote a post about more ways children discovered some of the properties of water, specifically water pressure and hydraulics

To offer the children a little different experience with water, I sometimes used liquid water color to color the water.  This was especially useful for the children to tract the flow of water though clear plastic tubing.

I wrote a post back in 2015 about the different tracking strategies the children used to track the the water through the tubes here. And wouldn't you know it, there was even a little bit about hydraulics again.

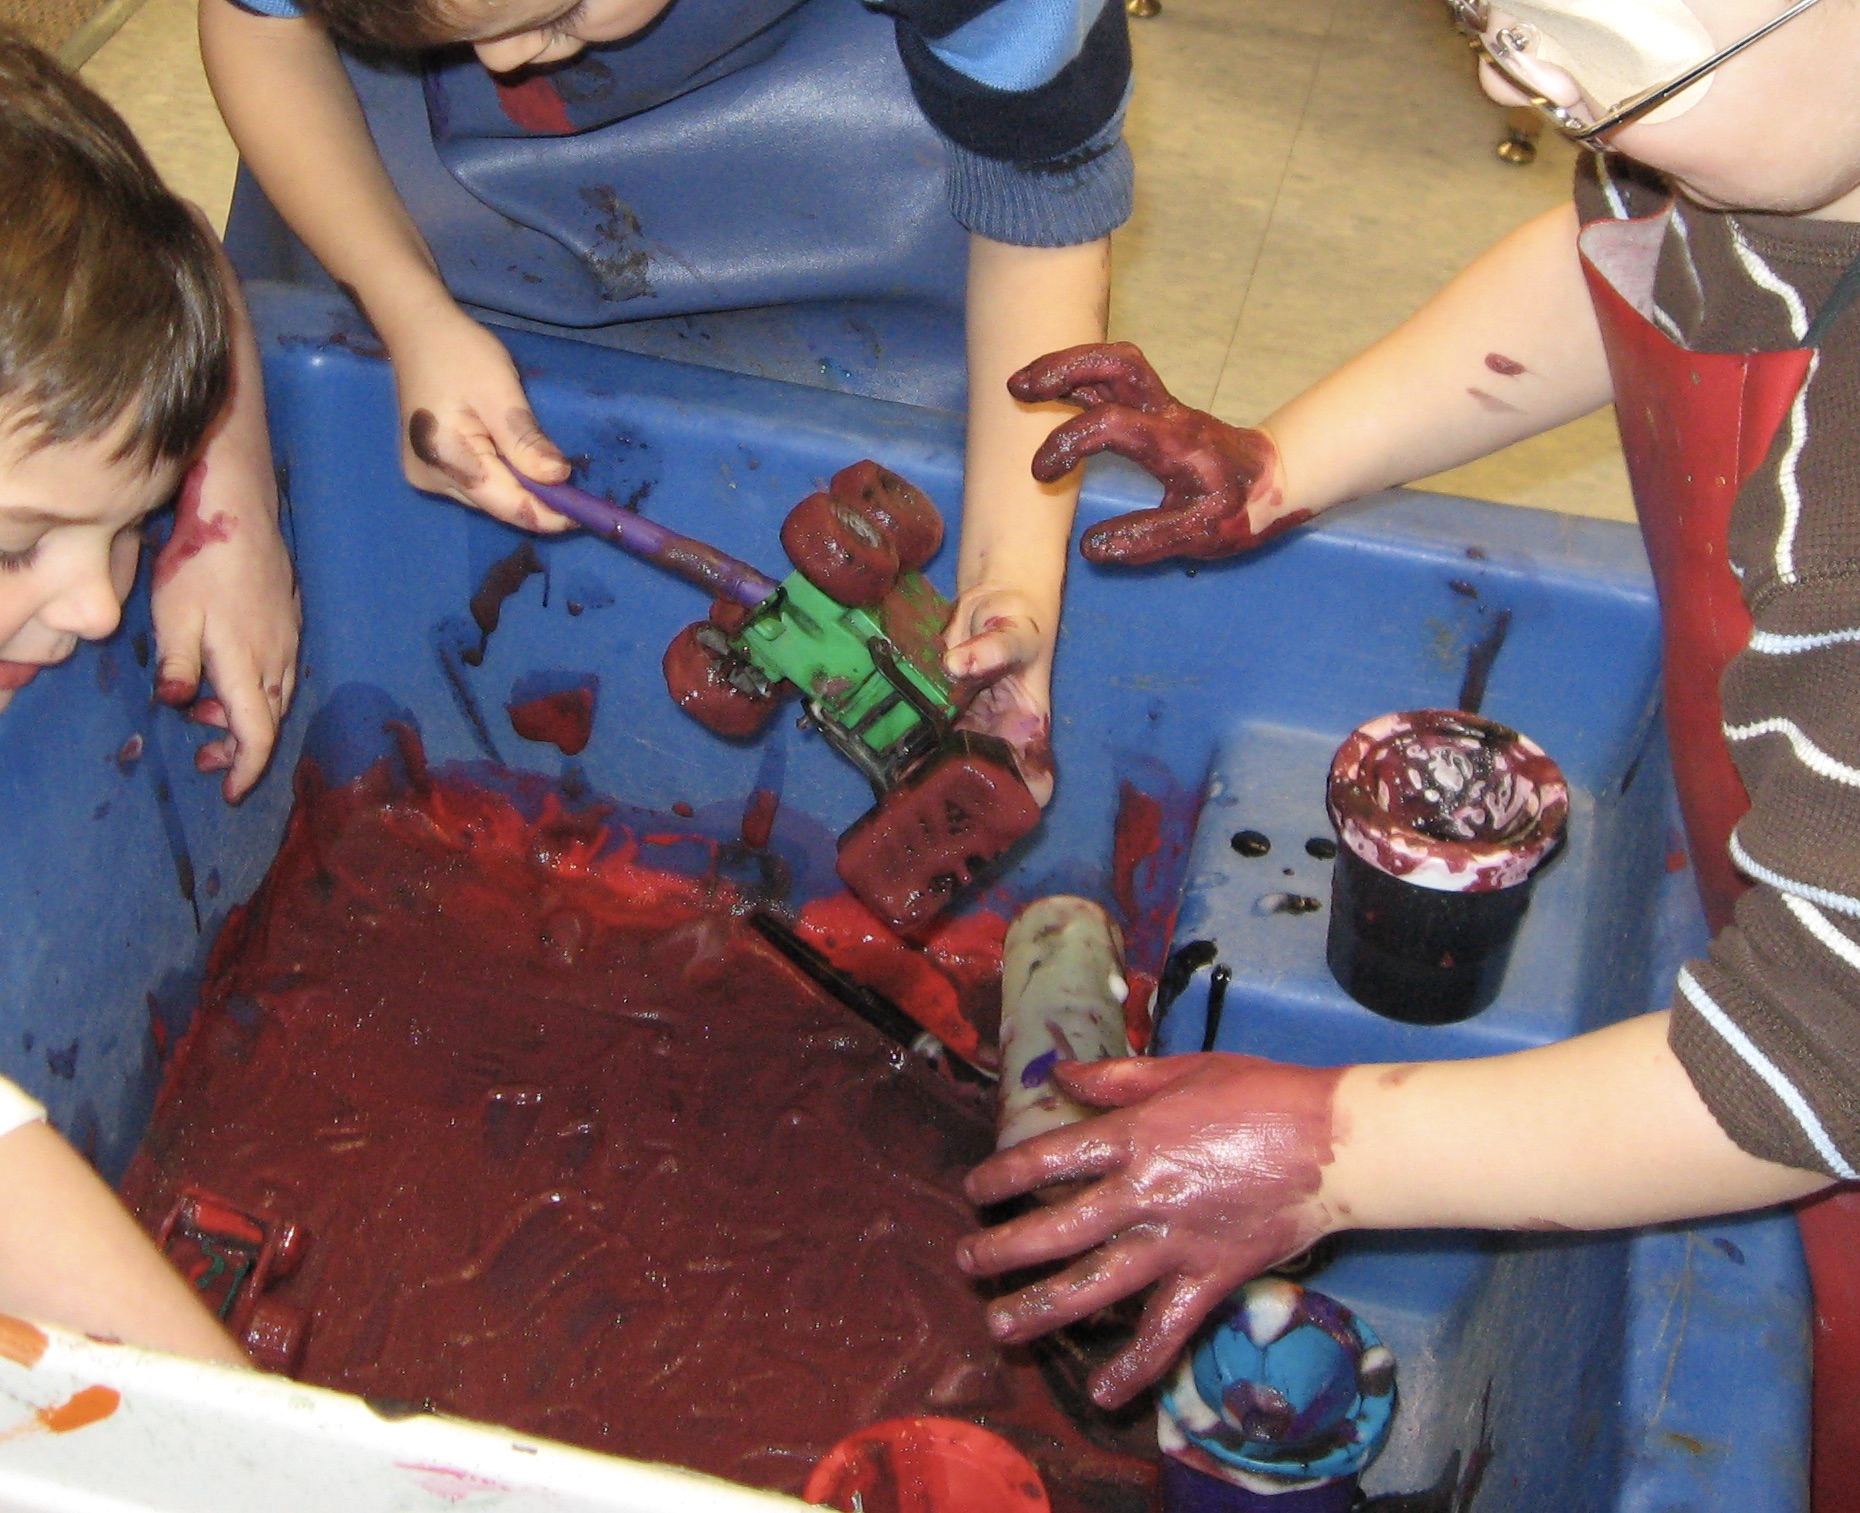
To offer children yet a different experience with water, I often added a little dish soap to the water.  That made it possible for the children to create suds.  Below, when the child poured water into the tray, the water dropping through the holes in the tray agitated the soap and water to produce suds.

Suds was a fantastic material.  One of the properties that the children discovered was that suds adhered to a lot things, like the hands and face.


Suds mixed with paint offered a unique experience for the children to mix colors, paint objects---including themselves---and generally make a beautiful mess.  


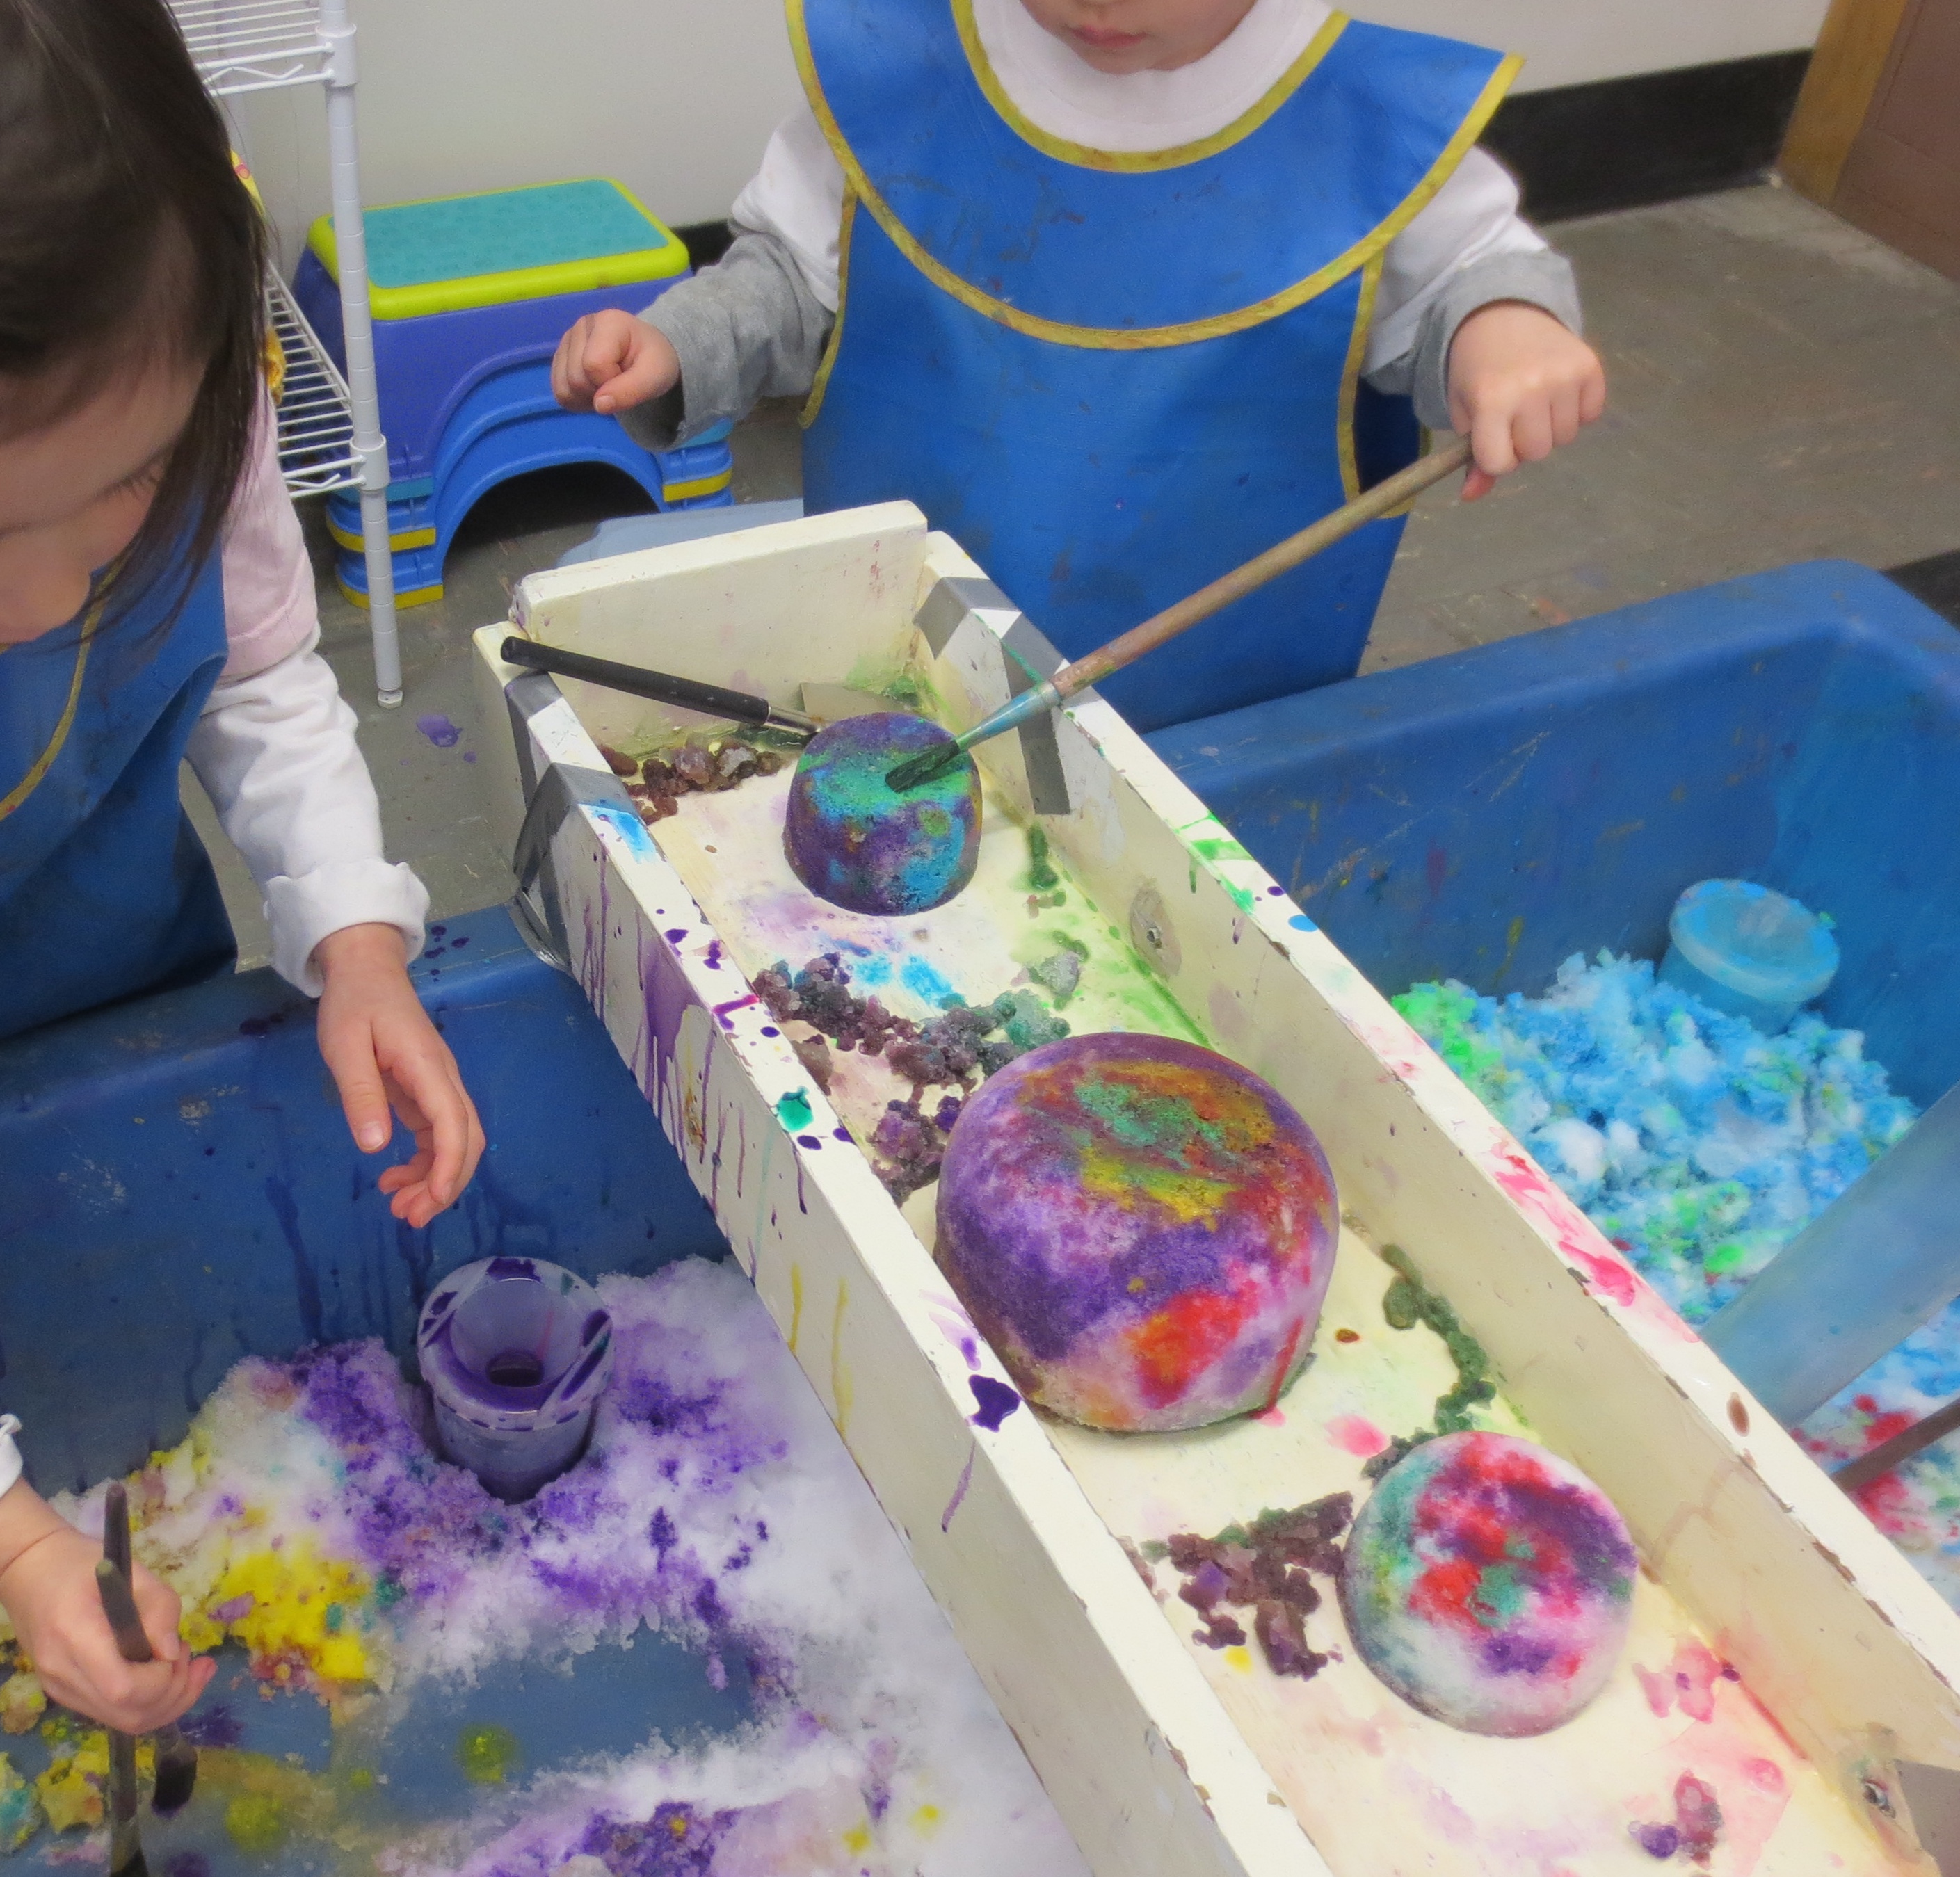
I live in Minnesota.  That means water often took on a different state in the winter, namely snow.  A few times each winter I would bring the snow into the sensory table for the children to explore. Because the snow was inside, the children could experience the snow without heavy coats and mittens.  Instead, they got up close and personal by handling the snow with their bare hands.  


Snow was also a great medium on which to paint because it offered the children a bright white canvas.  (Notice how the simple tray spanning the width of the table held the children's painted snow creations above the table of snow and even showcased those very creations.)

There was one more state of water that the children got to experience at my sensory table, namely ice.  Again, this was usually a material that I set out in the winter.  The usual invitation to explore the ice took the form of freezing things in ice and offering tools to the children to extract those things frozen in ice.

Water in the water table was so much more for me than cups for pouring and filling bottles and and other containers.  It was observing the children experiencing the different states of water with many different setups.  Those setups exponentially increased children's exploration of water and its properties.

This post has only scratched the surface of the rich possibilities for children experimenting with water in different states and with different setups. 

Next up: sand.


Tuesday, August 22, 2023

Sticks

A couple weeks ago, I wrote a post singing the praises of offering rocks for children's play and exploration at the sensory table.  You can find the link here.  Now let me sing the praises of offering sticks for children's play and exploration at the sensory table.

For me, the term sticks was a very broad category.  It included such things as bark, driftwood and sticks of various sizes, shapes, lengths and texture.

 
This display was just one example of items the children could choose from for their play in the sensory table.   This was more than a science table display; it was an invitation for the children to interact with these natural elements in their never ending quest to create.
 
This child balanced sticks over a bowl and then poured sand through the creation. Was this child recreating a camp fire?


This child got real creative by inserting a crooked stick into the hole of a tree knot to create a microphone. 

 
This child found a good size piece of bark to fashion it into a ramp for testing how rocks slid down.  That might sound simple, but in essence the child created a tool for her exploration.
 

Once I knew the children in my room and trusted them to use sticks more constructively than not, I introduced long sticks that I had collected on one of river walks along the Mississippi River.

These children decided to build "bridges" across the width of the table.  They then created a game in which they would place a bug on one of the sticks and then shake the stick so the bug would drop into the table.  (Believe it or not, there was absolutely no sword fighting with these sticks!)


I did say I had a broad definition of sticks.  In fact some of the sticks I offered the children were branches.

This child decided to take out all the branches from the sensory table and stack them on the floor.  I really felt like he was "working."  In any case, it fulfilled a need to transport coupled with the physical challenge of moving large pieces of wood. 

 
Again, I pushed the bounds of what constituted a stick by putting a stump and a tree trunk in the sensory table for the children to explore.

Speaking of transporting and physical challenges that children create for themselves, this child decided to move the trunk of the tree to roll it onto the stump.

If you want to read more about how I introduced sticks in the classroom and how the children made sense of those natural elements, check out this post and this post.

I knew that sticks were important for children.  Any time I would take a walk with children or my grandchildren, they would inevitably pick up sticks.  Since they were important for children, I made a point of bringing them inside creating a context in which the children found constructive ways to use them.

Sunday, July 30, 2023

Rocks

Rocks were one of my favorite things to put in the sensory table.  One reason was: I liked to bring natural elements into the classroom.  Another reason was: rocks in my collection came in all shapes, sizes and colors.  For example, some were porous; some were rough; some were smooth; some were heavy; some were surprisingly light; some were speckled; some had stripes. And another reason was: as a child, I just liked rocks. I would hunt for agates and, every chance I got, I would skip rocks across the water.  (I still like rocks and skip them any time I get a chance.)

Here was an example of a variety of rocks that I exhibited on a table next to the sensory table.  The rocks were there to explore and transport into the sensory table.

This set of rocks had many features to discover.  However, let me highlight just a couple.  There was a small gray rock that was smooth and had a round hole in it.  The fossil rock also had a hole, however the shape was of a telltale snail not smooth and round like the one in the small rock.  On the other hand, the volcanic rock had many holes and was quite rough.  Most of the rocks, like the petrified wood, did not have holes. 

By offering rocks in the sensory table, the underlying question was: What sense would the children make of them? Truth be told, there was no end to the sense the children made of the rocks as they explored their many features.

The rocks served as building material as one child stacked them in one corner of the sensory table.

That may sound simple, but because the rocks were smooth/slippery, different shapes and different sizes, that endeavor challenged his attempt to build higher and higher.

The little gray rock with the nice round hole became a scooping tool measuring just the right amount of sand onto the dustpan.

Another child created a bit of symmetry/art with the rocks by topping his birthday cake with rock  "candles."

One child discovered that by striking two rocks together, she could spice up her concoction with a little bit of cinnamon.  


Somehow she figured out that hitting the soft, reddish-brown rock against the harder rock resulted in tiny flecks that she saw as a special spice.

One child amazed himself by using one rock to draw lines on another rock.   (Do I dare venture a guess that this was how early humans began the transition to written language?)

I have only scratched the surface of how children came to understand rocks, but let me give you one last example of a child making sense with rocks.  This happened with a rock-query episode during which a child searched for rocks with specific attributes.  I wrote it down in real time on a large post-it easel pad sheet that I taped to the wall next to the sensory table.  S is the child and T is the teacher

The child began by looking for a "pretty big rock."  She found what she was looking for but then began a new search for a different kind of rock.  She again found what she was looking for: one that was "shiny, heavy and little.

I could point out that this was a spontaneous vocabulary exercise, but that was just a by-product of a natural conversation about finding the right kind of rock.  That was true of the other examples, also.  Children began to build their knowledge of rocks as a by-product of their experiences with the real rocks.

p.s. Some may be uncomfortable with rocks in their classroom.  There may be an underling fear that children will throw the rocks.  That may be a valid fear so it is important to know your children.  If I thought a child might throw a rock, I would do one of two things: closely supervise the child or remove the rocks.  However, that was so rare, I don't ever remember doing either of those interventions.

I believe that if children are given constructive ways to play with the materials in the sensory table, they will do so responsibly and in the process start to understand the materials and what they can do with them.

One child was very intentional fitting nine rocks into this jello mold. Wait! Are those square rocks in there?  Is there such a thing as a square rock?


Sunday, July 16, 2023

Strategy #3 for changing the sensory table.

Two weeks ago I began a series of posts about the three strategies I used to make changes more manageable in the sensory table so every week for the entire school year the children would experience something new there.  The strategies were: 1) to keep an apparatus for a second week but change the medium in the table; 2) to keep an apparatus for a second week but add on to the existing structure; 3) to keep an apparatus for a second week but change its orientation.  To read about the first strategy, here is the link  To read about the second strategy, here is the link.

This week's post is all about strategy #3.  As an example, I will start with an apparatus made from a big box used by moving companies to quickly pack up clothes hanging in a closet.  It is called a wardrobe box.  I set the box up on an incline by taping the box to a wedge contraption and the lip of the table on the low end of the box.  I cut multiple holes in the box so the children had multiple entry points for their play and exploration.  I cut a slit in the low end of the box so when the children poured the feed corn down the wardrobe box incline, the corn dropped into the tub at the end of the table.

Children made use of all the holes.

They even even explored the bottom slit through which the corn exited the big box apparatus.


This apparatus had two highlights that could have been overlooked.  The first was that the children pouring the corn down the box were connected in play with the children at the bottom of the box.  That was all the more unique because they could not see each other since there was no hole cut out at the bottom of the box except the narrow slit where the corn exited the box.  The second was that it was a total aural experience as the corn tumbled down the inclined box.  It took on greater significance when a child at the end of the box knew to listen to the sound of the tumbling corn so they could get ready to catch the corn as it spewed from the box.

I wanted to use the wardrobe box a second week, but with a simple change.  I removed the wedge contraption and laid the box horizontally across the width of the table.


I used planter trays to support the big box across the width of the table for extra stability.  Not so unexpectedly, the planter trays offered opportunities for children to scoop in a horizontal space.

 
There was a huge difference in the children's play from the previous week when the big box was set on an incline.  One of the biggest differences was the sound of the children's play.  On the incline, the sound of the corn tumbling down the box was amplified which made for pretty loud play.  With the box on the horizontal, however, play was significantly quieter.

Another difference was that on the horizontal, children explored the inside of the big box with there bodies more.  The horizontal orientation was at a level that seemed to invite the children in.
 

If you want to make your own comparison, you can find the original write up on the incline apparatus here and you can find the original post on the horizontal apparatus here.

Come to think of it, I did have a 4th strategy for making changes every week at the sensory table more manageable.  There were several apparatus made from wood or tubes or pipes that I would save and set up from year to year.  The examples I used for the three strategies were made out of cardboard.  When I was done with them, I would recycle them.  I knew there would always be a cardboard box when I needed to build a new apparatus. And besides, a new box would inevitably offer exciting possibilities for a completely new apparatus.

Sunday, July 9, 2023

Strategy #2 for changing the sensory table

Last week I began a series of posts about the three strategies I used to make changes more manageable in the sensory table every week for the entire school year.  They were 1)to keep an apparatus for a second week but change the medium in the table; 2)to keep an apparatus for a second week but to add on to the existing structure; 3)to keep an apparatus for a second week but to change its orientation.  To read about the first strategy, here is the link

This week's post is all about strategy #2.  As an example I will start with an apparatus I called the BRIDGE.  I called it that because an I Mac box formed a bridge between a large furniture box and the sensory table.

 
This apparatus essentially expanded the sensory table.  It left the table as a open reservoir for the feed corn.  It also offered the opportunity for the children to transfer the corn between the boxes and back into the table.  I cut numerous holes on different levels in both boxes.  The structure itself created a new play space under the bridge.
 

Here is another view of the apparatus.  The I Mac box was taped to the lip of the table and embedded in the large furniture box making the structure very sturdy

The children found, explored and gladly played on every level of the apparatus through the many holes.


You can find the original write up on this apparatus here
 
For a second week, I kept the original bridge apparatus but added two more boxes: another I Mac box and a long square box.

 
The new I Mac box was taped to a planter tray that spanned the width of the table and the long square box was embedded through both I Mace boxes.  By adding more boxes and cutting more holes, I was able to offer the children so many more possibilities for  play and exploration.
 

As you can see, some of that play and exploration was up close and personal.  You can find the original write up on this expanded bridge apparatus here. 
 
Could I have kept adding boxes?  Yes, of course.  In fact one year I kept adding boxes for three weeks until I had over 20 boxes in and around the sensory table.
  
 
Next week: Strategy #3


Saturday, July 1, 2023

Changing the sensory table

I am often asked: How often did I change things in the sensory table?  My answer has always been that I changed what was in the table every week.  There were two main reasons why.  The first reason was that building the apparatus for the sensory table was a creative outlet for me.  (I do believe that we all need a creative outlet to stay fresh in the classroom.) The second reason was that I wanted to offer children novel sensory experiences on a consistent basis.  To that end, I was able to offer something new in the sensory table every week of every school year I taught.

To make that a manageable proposition, I employed three strategies.  The first was to keep an apparatus for a second week, but change the medium that was in the table.  The second was to again keep an apparatus for a second week but add something to the existing construction.  The third strategy was to again keep an apparatus but change its orientation. (Orientation is highlighted on the right-hand column of this blog.)

Let me give you an example of the first strategy.  For this example, I offer you an apparatus I called horizontal channels. 

 
I constructed this apparatus from a box in which a new easel arrived.   It was long, wide and narrow.  I wanted to take advantage of those features so I cut out one complete side and inserted channels. This apparatus rested on top of the cover of the sensory table.  You can find the original write up for this apparatus here

The first time I set this apparatus out, I used regular play sand as the medium.  I subsequently replaced the sand with feed corn.
 
 
The corn and sand had different textures; sand felt gritty whereas the corn was smooth.  They made different sounds as they were dropped or slid across the cardboard surface: the sand made scraping sounds whereas the corn made popping sounds.  They had a different smell; the sand had an earthy smell whereas the corn smelled like---well---corn.  There was also a difference in how the vehicles performed in the media; the sand was a little heavier so it took more effort to move it down the channels with the vehicles whereas the corn was lighter so less effort was needed to push the corn.  Because I changed the medium in the sensory table, the children experienced the same apparatus differently.
 
I rarely used the same apparatus more than two weeks in a row.  However, I did find other media to use in the channel apparatus in other years.  
 
One year I used a white play sand.  The sand was soft and dustless and very fluid.  (When buying sand, make sure that it does not contain free silicates.)
 

For the second week, I replaced the sand with wood pellets, which had many of the same properties as corn, but was still a little different.  For example, the pellets were like round, miniature logs that rolled easily through the channels and down the chute.


By the way, if I knew---and remembered---I elicited the children's help during the last class of the week to assist in emptying the medium out of the apparatus into a storage container.
 
 
Clean up and play became synonymous when the children willing helped.  From my experience, children were almost always willing to join in the work if it was real work that made a difference in the classroom and if they felt appreciated for their contribution.
 
Stay tuned for examples of strategies two and three in subsequent weeks.

Saturday, June 17, 2023

Here's another idea

Last week I encouraged those who wanted to build constructions for the sensory table to start simple.  Here is another idea: remove the sensory table all together and just replace it with multiple containers, buckets and tubs.  Of course, you also want to provide plenty of those hodgepodge and doohickies.

With this idea, I purposely highlighted the very first phrase of axiom #1 listed in the right hand column of this blog: Children need to transport.  By taking the sensory table out of the room entirely, I created an invitation for the children to devise multiple transporting operations of their own choosing.

Back in March of 2016, I wrote a post about what did happen when the children generated their own transporting endeavors.  I had the audacity to call it: Transporting paradise.

The setup worked so well, I tried a second version of the transporting paradise.  For this version, I removed some of the tubs and buckets and added plastic chutes and cardboard tubes.

The children treated me to a host of new transporting operations, like building a bridge to transport the pellets horizontally.

One child decided to use a plastic chute as a tool to fill the "bridge" plastic chute.  Both instances were brilliant examples of basic engineering assemblages.

With no sensory table to contain the material that usually goes in it, there was more than the usual amount of spillage onto the floor.

However, all that spillage created opportunities for the children to practice their broom and dust pan skills.  More importantly, it turned out to be good practice for taking care of the room through cleaning up our messes.

The second setup really did generate more mess.  I wrote about this setup's unique transporting operations and its subsequent mess in a blog post I called: Don't do this.

For those ECE people who have to share a room, this may actually give you some ideas about buckets and containers that nest inside each other and can be easily stored.  

The setup was rather complex.  You may want to try it, but like I said last week, start simple!