About Me

My photo
Early childhood education has been my life for over 40 years. I have taught all age groups from infants to 5-year-olds. I was a director for five years in the 1980s, but I returned to the classroom 22 years ago. My passion is watching the ways children explore and discover their world. In the classroom, everything starts with the reciprocal relationships between adults and children and between the children themselves. With that in mind, I plan and set up activities. But that is just the beginning. What actually happens is a flow that includes my efforts to invite, respond and support children's interface with those activities and with others in the room. Oh yeh, and along the way, the children change the activities to suit their own inventiveness and creativity. Now the processes become reciprocal with the children doing the inviting, responding and supporting. Young children are the best learners and teachers. I am truly fortunate to be a part of their journey.

Saturday, February 24, 2018

Another oldie

A few weeks back, I wrote that I got a new toy.   It was a scanner that now allows me to see and scan pictures pictures I took a couple of decades ago when I first started building apparatus for the sensory table.   It is not perfect because it is hard to get the color right, but it is still fun to play with.

Here is an apparatus I built over 20 years ago.  Like many apparatus, it started out as a box that caught my eye.  The box was big compared to my small sensory tables so I did not want to fit it inside either table.  Instead, I decided to place it in between the two tables.  That looked pretty promising. 
I did not want a closed barrier between the two tables so I looked for a way to connect the two tables.  I had some scrap culvert drainage pipe that I decided to embed through the box.  The polyethylene pipes were sturdy so the ends did not need to be supported.  Interestingly, that gave the impression that they were somewhat suspended in midair.
To make it easier for the children to pour the sand into the pipes, I cut away pieces from the top of each pipe.  For the longer piece of pipe, I cut a piece that went all the way through to the other side of the box so the children had a peek at the sand falling through the pipe on the side with the yellow sand table.  Below you can see the child dumping the sand into the pipe through the top piece that was cut away.

Besides being stiff, the drainage pipe had another unique feature: it was ribbed.  As a consequence, sand would get caught in the ribs as it was poured into the pipes.  That also meant there was a little delay from when a child poured sand into the pipe and when it came out the bottom.

One thing I noticed about these old pictures is that the children seemed to enjoy working on the lowest level for their play.  They knelt because the sand table is low, but kneeling also required them to use different muscle groups for balancing and doing other operations.


When I first started to build apparatus for the sensory table, I took pictures to record what I built and how I built it.  Because I was doing it to record what I built, I did not take a lot of pictures documenting how children made it their own.  Part of the reason was that film and the developing of the film was too expensive to take gads of pictures.  More importantly, though, I did not have the mindset that challenged me to do more than just record.  

I am glad I was able to record.  We all have to start somewhere.  However, I find myself a bit empty when I try to make meaning from these old pictures.  Children are competent and they are always thinking but with so little documentation with this apparatus, I cannot speculate on the meaning of their play.  


Saturday, February 17, 2018

Entry points for play

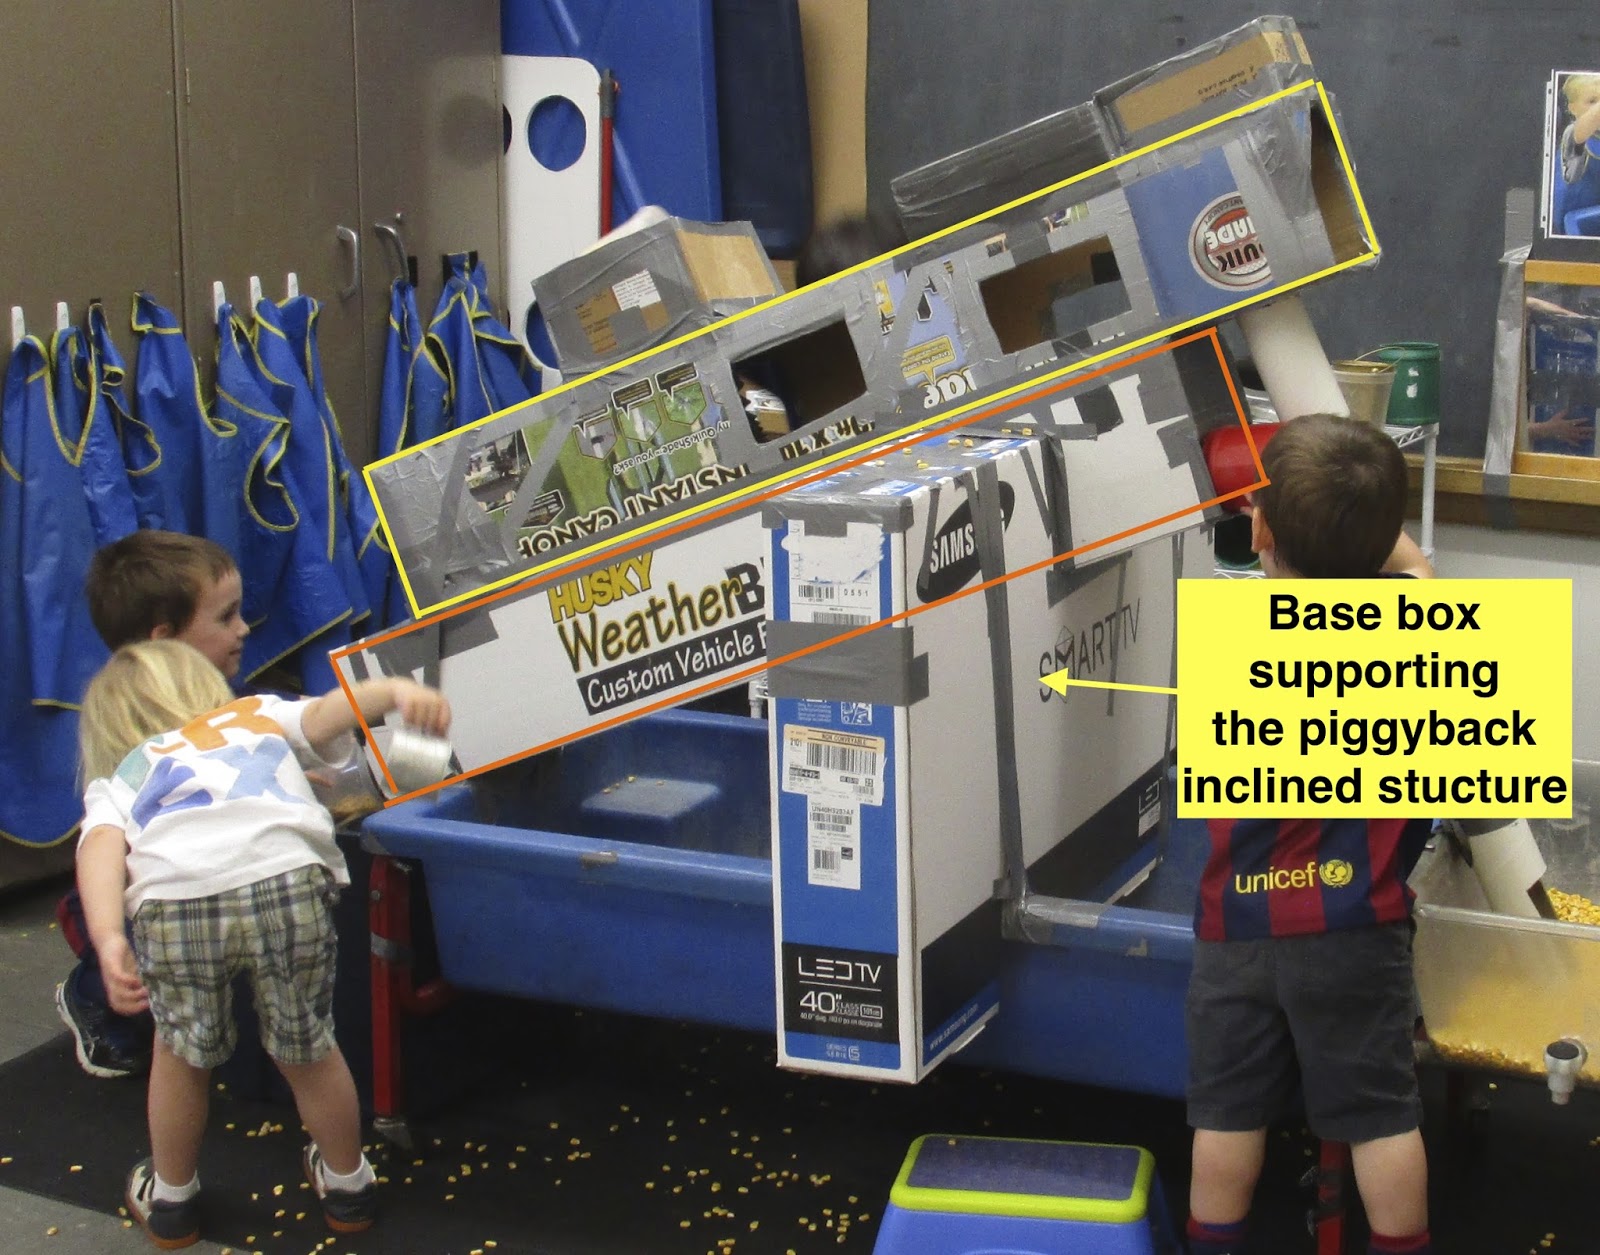
I was looking over my photos and videos from a water pump apparatus I set up a couple of years ago.  I wrote about it here and here.  I started to note all the entry points for play in this one apparatus. 

Kodo Kids has a 
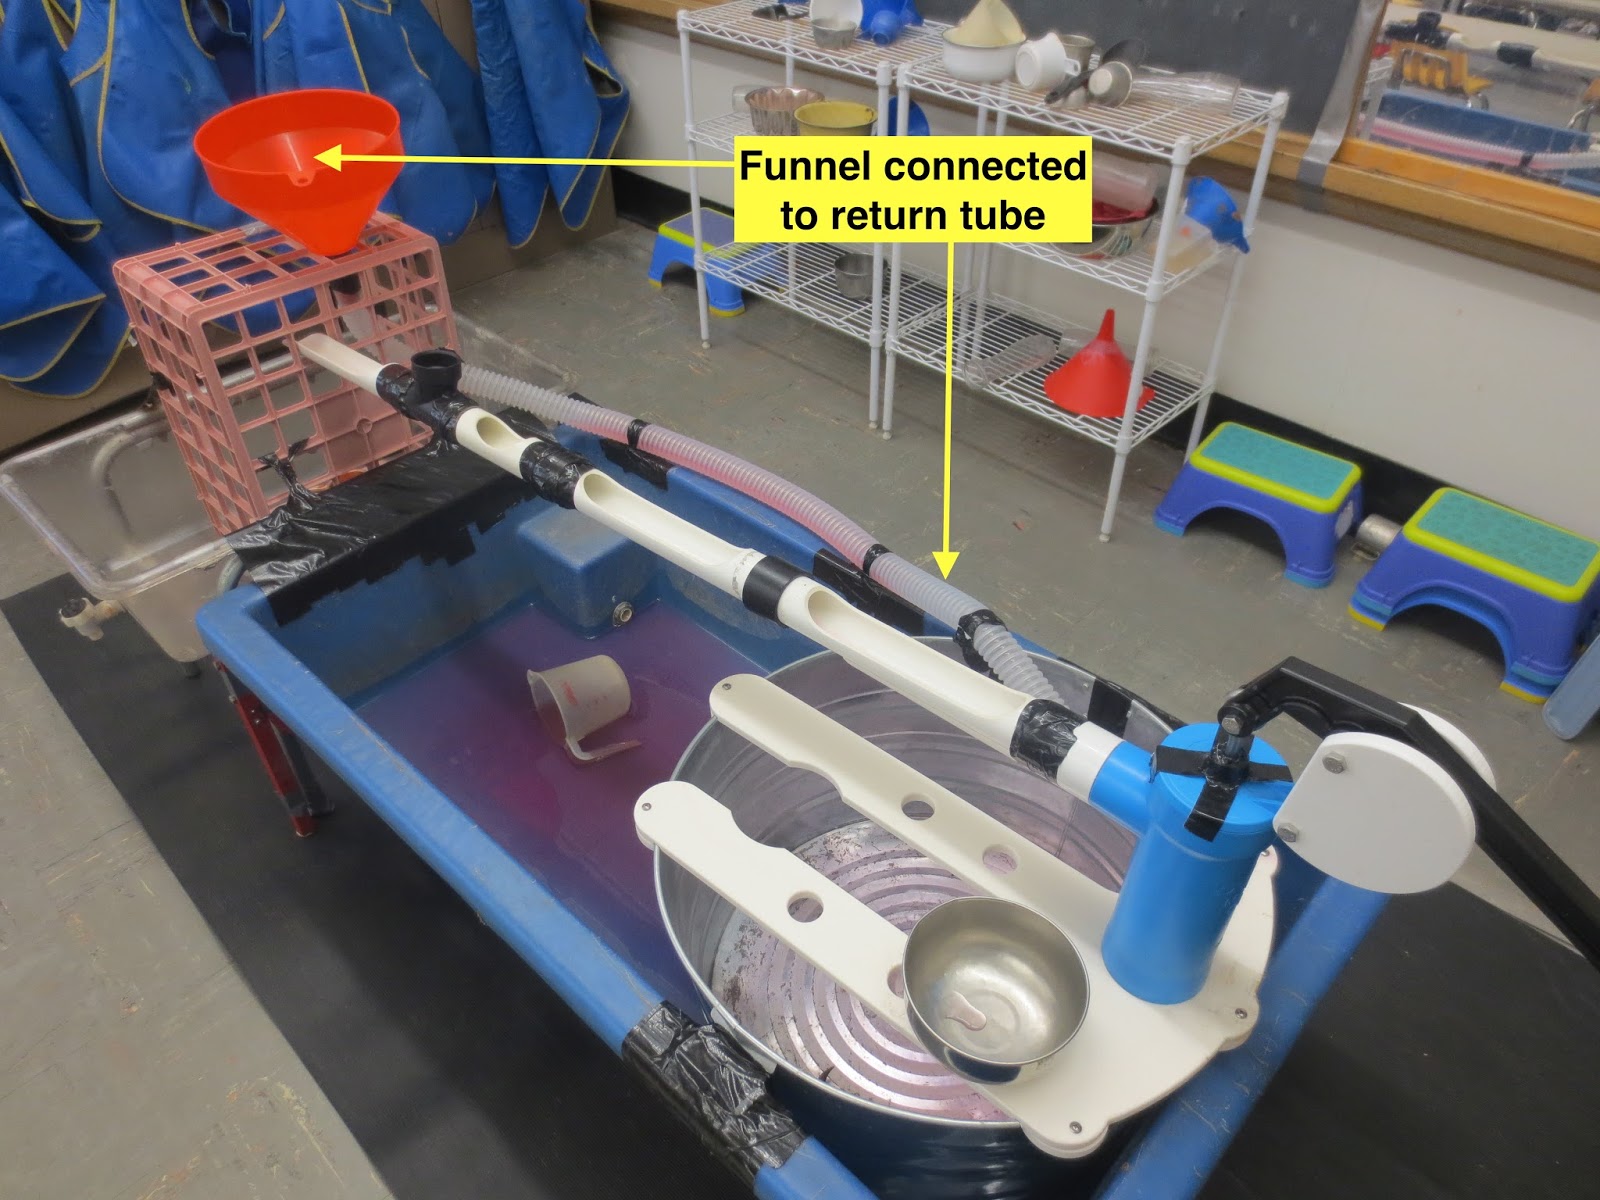
pump works kit that I set up in my water table.  It comes with a pump that attaches to an aluminum tub.  It also includes various pipes and connectors.
There is no right or wrong way to put it together.  I set it up so the pipes traverse the length of my blue sensory table horizontally.  The end is supported by a crate so the water from the pump empties into the small, clear water table.  On top of the crate I inserted a large funnel.  To the large funnel, I attached a long, flexible tube so there would be a loop so the children could return the water to the pumping tub.

How many entry points for play did I find with this apparatus?  Too many to highlight in the post, but here are a few.  And maybe with a few surprises.

First and foremost, there is the pump.  When I take a closer look, I also see that a child has used part of the pump base over the aluminum tub as a platform to hold her bottle so she can work hands-free to fill it.  
Not only that, I can also see that a child has placed a funnel in one of the holes in that same base.   Instead of just pouring water into the tub, now the children use the funnel to direct the water through one of the base's holes.

To be clear, the pump turns out to be an entry point for play for more than one child at a time.  And now, the entry point becomes a lot more about cooperation and coordination of their movements to be successful at pumping.

A second entry point for play is the end of the pipe that empties into the small water table through the crate.  Below, a child is catching the water coming out of the pipe with an aluminum bowl.
When I take a closer look, I also see a child scooping water out of the small sensory table to fill the bottle he is holding in his left hand.  In addition, I see a green pail with water.  That pail expands and connects their play because these two children use it to empty their containers once they are filled.

To be clear again, the end of the pipe where the water comes out inside the crate can be an entry point for play for more than one child.  In the picture above, three children are using their bodies to negotiate taking turns to collect water.   There is actually no conflict even though there is no adult to line them up or encourage them to take turns.

A third entry point for play is the big funnel.   In the picture below, the child is figuring out where the water goes when he pours it into the red funnel.

To be clear yet again, the big red funnel can be an entry point for play for more than one child.  In the video below, three different children pour water into the big red funnel.  In addition, one child pours water into a blue funnel, a funnel he has placed into one of the top holes of the crate, thus creating his own entry point for play. 


Water and funnels from Thomas Bedard on Vimeo.


What I find interesting in this video is the flow of play around a couple of focal points that bring children together in such close proximity. 

Looking at the whole apparatus, one can see that there are multiple entry points for play along the expanse of the apparatus.

Now imagine the table without the water pump apparatus.  How many entry points for play would there be?  


Saturday, February 10, 2018

The need to climb

Some of the apparatus I build actually invite children to climb.  Here is a good example of one.  I call it the piggy back incline.  Basically it is two long, narrow boxes combined to make one big inclined chute.  The boxes are taped together with holes on the inside of the top box (yellow outline) all emptying into the bottom box (orange outline).  A large TV box is used to support the combined structure.

Here is the same picture showing the holes into which the children pour the corn.  Holes 1-7 are cut in the top box and empty into the bottom box.  Hole 8 is the top end hole for the bottom box.  All the corn from those 8 holes ends up at the low end of the bottom box and empties into a tub next to the end of the table.  Hole 9 empties into the small clear sensory table through a long white cardboard tube.

If you understood all that you are a spatial genius.   If you want a little more detail on how I built this, you can go here.

Because this apparatus rises high above the table, I know it invites children to climb.  They are always exploring every level of an apparatus, so naturally they will play on the highest level afforded by the apparatus (see axiom #3 in the right-hand column of this blog). To that end, I set out stools for the children to use to reach the top of the apparatus. 

Some children need to see where they are pouring the corn.  For a child to see the topmost hole in this apparatus, he actually has to climb onto the lip of the table. 

That need to climb looks different for different children.  Some children are content to execute their maximum reach by stepping on the stool and pouring into a hole they can't even see.  Interestingly, though, they get plenty of feedback for their actions because they are able to see where the corn goes.


For some children, climbing is more than standing on their tiptoes and reaching as high as they can.  For some, climbing is a physical challenge to test their strength, coordination and balance in a problem they pose for themselves.  In one case with the piggyback inclines, the physical question is: Can I climb and balance on the lip of the table to pour the corn into the hole on the top of the structure?


Balancing on the lip of the table from Thomas Bedard on Vimeo.

This video is an excellent example of a child who really needs to test---even challenge---her physical abilities.  A perfectly reasonable and responsible teacher can look at her stepping high off the ground and balancing on the 3" lip of the table and see a situation that puts the child in danger of falling.  I will never dismiss that possibility, nor take it lightly.  What I choose to see is the body mechanics of how she is climbing.  For instance, as she bends down to pick up the pail of corn, she does so slowly all the while gripping the box with her left hand.  When she stands straight up and her left hand lets go of the box so she can hold the pail with both hands to pour, she places her left elbow against the box for balance.  She uses her torso against the box to balance in the act of pouring her corn in the hole. When she climbs down, she again grips the box with her left hand.   All those body mechanics tell me she is capable of this challenge, a personal challenge that is genuine because she has created it herself.

I contend that children need to climb.  It may be easy to provide that experience outside or in a large muscle room.  So what happens when a child shows a need to climb in the classroom?  How do we plan for that?  Some children are easy because their climbing is done by standing on their tiptoes.  Others have a greater need that can be satisfied with stools or steps.  But what do we do for the children who need more of a challenge, who need to create their own challenges? 

To be clear, I am not advocating that you should be as comfortable as I am with children climbing on the table.  Everyone has to know their own comfort level.  I worked with other adults in my classroom who were not comfortable with the children climbing so high.  I would always tell them that if they were monitoring that area, it was up to them to decide their own comfort level.  If they were not comfortable with children climbing on the table, they were to own it and set their own limits.  Over time what I saw was that co-workers were willing to push their own limits of what was acceptable after watching me and watching how capable the children were in managing their own risks. 

Saturday, February 3, 2018

New toy

On my computer, I have over 35,000 photos and videos.  Not all of those are from the classroom, but I would make a rough guess that over 25,000 of them are.  However, before digital, there was film photography.  I have saved all the negatives of the pictures I took in the classroom.  Since I started taking pictures more than 28 years ago, I had a lot of photos to which I really had no access.

Not anymore!  I bought a scanner that makes digital pictures from the negatives and transfers them to an SD card.  I use the card, then, to upload the images to my computer.  It is not an expensive scanner so the color is a bit off, but I am happy to have access to all those old photos.

Here is the first picture I scanned.  This is an apparatus I built back in 2000 using chewing tobacco dispensers.   Yes, chewing tobacco dispensers.  By the year 2000, I had already been building apparatus for 12 years.  By then, parents were always on the lookout for interesting objects to offer for a new building project.  One parent worked in a gas station/convenience store where they sold chewing tobacco.  He saved two dispensers and offered them to me as a challenge to see what I could build.
I taped one of the dispenses on top of a box and the second one to the side of the same box directly below the top dispenser.  I taped a piece of cardboard at the bottom end of the top dispenser to create a flap that directed the sand into the bottom dispenser.  I covered the tobacco signage for both of the dispensers with a sheet of mirror plastic.

In essence, these were ready made chutes into which the children could dump their sand and then try to figure out where it went.  They could actually fill the bottom dispenser if they poured enough sand down the chutes.


There was more to this apparatus than the dispensers.  A second, small box was taped behind the top dispenser.  I installed that box such that it hung over a second sand table.  
It was a simple addition, but it added a connection between the two sand tables, a connection that allowed the children to move the sand into the clear sand table from a height over a moveable flap. In addition, since the clear sand table was on legs, there was another level for the children to work on.  (See axiom #3 on the right-hand column of the blog.)

Not only are levels important for children to begin to understand space, but multiple levels offer multiple entry points to explore the setup. 
Multiple entry points, in turn, increase the number of children who can engage in play and exploration at any one time. 


I said that the color was a little off.  What I found is that with some simple tools in iPhoto, I could manipulate the colors to make them look almost right.  The picture on the left is the one I transferred from the scanner.  The picture on the right is the one I adjusted for exposure, contrast, saturation, temperature and tint.

It is a bit slow and involved to recover old photos, but now I have a new toy to play with and I am thrilled at the prospect of re-discovering old creations.   And it is always a plus when play and work are synonymous.