About Me

My photo
Early childhood education has been my life for over 40 years. I have taught all age groups from infants to 5-year-olds. I was a director for five years in the 1980s, but I returned to the classroom 22 years ago. My passion is watching the ways children explore and discover their world. In the classroom, everything starts with the reciprocal relationships between adults and children and between the children themselves. With that in mind, I plan and set up activities. But that is just the beginning. What actually happens is a flow that includes my efforts to invite, respond and support children's interface with those activities and with others in the room. Oh yeh, and along the way, the children change the activities to suit their own inventiveness and creativity. Now the processes become reciprocal with the children doing the inviting, responding and supporting. Young children are the best learners and teachers. I am truly fortunate to be a part of their journey.

Sunday, December 27, 2015

CLASSROOM PHOTO OF THE YEAR

Two years ago I started a tradition of posting a Photo of the Year from my classroom.  This is last year's.  The picture captured a child building with ordinary loose parts on the floor next to the sensory table.
If you want to know why this was last's years photo of the year, you can read about it here

Two years ago, this was the photo of the year.  This snapshot revealed the traces of children's building in the widow with window blocks.  You can read about it here.

This year's photo of the year was taken in yet another area of the classroom, the large motor area.  The particular day the picture was taken, the rocking boat was set out on the mat that defines the large muscle area.  The children asked to turn over the boat so they could use it as steps.  The children used it in many different ways.  One of the ways was to lunch themselves off the top step to see how high and far they could jump.

Little did I know that it could be used for something other than large motor play.  However, sometime during the middle of class, a child asked me to come over to the steps to see what he had done.  This is what he wanted to show me.  And this is my Photo of the Year.
I was immediately struck by the symmetry of what he did.  I asked him: "What did you make?"  He told me: "Pizzas!"  Now I was really impressed.  He had used triangle Magna-Tiles to make pizzas.  As he made each pizza, he would put it on a shelf to cool.  He put three pizzas on each shelf for a total of 15 pizzas.

I asked him how he cooked the pizzas?  Before I can show you how he cooked the pizza, I have to explain an apparatus that was next to the large muscle area that I had set up earlier in the year.

I installed a horizontal periscope on top of the block shelf.  On the left, the the child is putting blocks in one end of the periscope.  On the right, he is watching one of the blocks come out the other end of the periscope.


How did he bake the pizzas?  He appropriated the horizontal periscope to be his oven.
He would put the pizza in one end of the oven to bake and then take the finished pizza out the other end.


Baking pizza from Thomas Bedard on Vimeo.

When I saw what this child had done, I thought about how we as teachers so often set up and script role play for the children be it a restaurant, a pet store, etc.  This child created his own pizza parlor by combining the Magna-Tiles (the pizzas), the horizontal periscope (the oven) and a place to cool and display the pizzas (the upside down rocking boat).  In other words, the picture perfectly illustrates a child's meaning making purely through using his imagination to combine totally unrelated elements to create a coherent narrative.

Pizza anyone to go with a Happy New Year?


Saturday, December 19, 2015

CLASSROOM PICTURE OF THE YEAR REVISITED

Two years ago, I started posting my Classroom Picture of the Year.  I will do that again this year, but I would like to revisit the original post from 2013 because there is a sequel to that post that just occurred last month. Here is most of the original.


Sunday, December 22, 2013

MY CLASSROOM PHOTO OF THE YEAR

I take thousands of pictures in the classroom every year.  The ones you see are almost exclusively from the sensory table.  My pick for classroom photo of the year shows a different area of my classroom.  It is an area that most teachers would consider off limits to the children.  The area encompasses a ledge and windows.
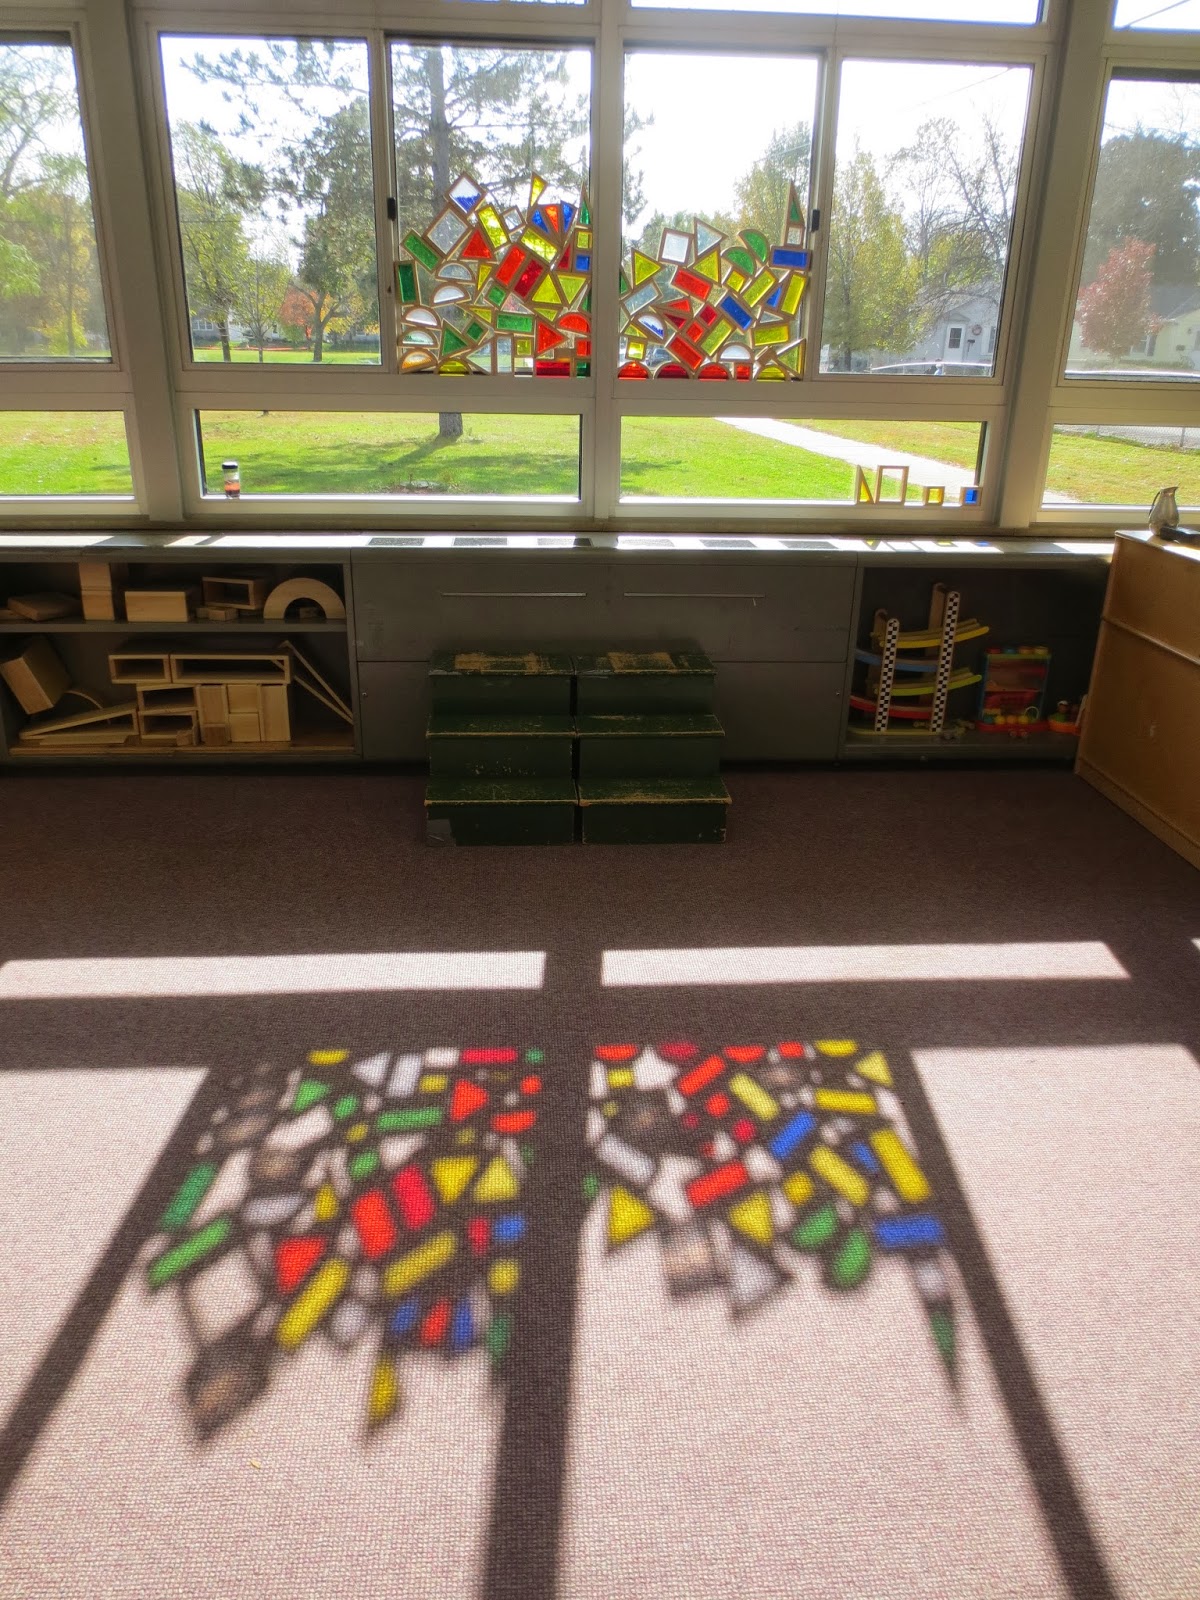
The ledge is three feet off the ground and a foot wide and accessed via wooden green steps.  Last year, I moved the color blocks to the windows so the children could look out to see the world in different colors.

Now that you understand the space, here is my favorite classroom picture of the year.   I call it: Vestige of Play.
Are you surprised there are no children in the picture?  There are no children, but this picture reveals a  trace of something created by two children in the morning class.  The trace is rendered more impressive with the effects of the afternoon sun.

Like any good picture, there is a story.  The story begins with a serendipitous moment and weaves a continuing thread that actually lasts a couple of days.

It is cleanup time.  Two boys have been building with the color blocks on the ledge.  For cleanup, I ask them to put the color blocks back in the window.  Up until this point, the color blocks have resided in the lower window. One of the boys, who was not too thrilled about putting away the blocks, finally relents. But instead of putting the blocks in the lower window, he starts putting them in the higher window. He gives me a sideways glance as if to say: "If I am going to put them away, I will put them a way on my own terms."  I just tell him: "That works."  With no further prodding, they willingly stack the blocks in the higher windows.

This is what it looked like when they were done.  It was impressive, but when I came back in the afternoon, the sun had worked some magic to make it a stunning sight---and my classroom photo of the year.
 
Three days later, another child noticed the blocks stacked in the two upper windows.  He set about stacking all the color blocks in one window.
Did you notice he is on his tip toes on the bottom window ledge?  He is balancing the blocks while balancing himself.  That is quite a balancing act.  


THE SEQUEL:
Two weeks ago, the child who filled the entire window with the blocks more than two years ago visited my room. During the year, I often have "alumni" visit when their regular school is out. I took the opportunity to show him what he had done in the window two years ago.  He promptly went to the window and started building again.  His older sister, a third grader, joined him. No need for tip toes this year.
Think about this.  You have a first and a third grader visiting a preschool classroom.  How do they create some meaning to their visit that is not simply playing with the little kids?  This day, because the child could revisit documentation from two years ago, the brother and sister were able to climb up on the ledge to build a stain glass window.
two, in fact. 

These two school-age children did not just recreate the original window.  Through negotiation and accommodation, they have re-imaged it.  In so doing, they have configured not one, but two striking spaces in the preschool room they can call their own. 


Saturday, December 12, 2015

HOLES AND MATH

Holes are important to children.  So important that I have included them in the right-hand column of the blog twice.  Under dimension and elements, holes are listed under #5:  Children need to put things in holes; include holes of various sizes and shapes on various levels.  Under axioms, holes are also listed under #5: Children are compelled by nature to put things in holes; they will find every hole and even try to alter the shape and function of holes.

The Concrete Forming Tube apparatus is a study in holes.  Let's start with the long, cardboard tube that rests on top of the concrete forming tubes.  There are seven holes: a top hole and a bottom hole, two rectangular holes and three smaller, round holes.  Thus, the holes vary in size and shape on multiple levels.
Essentially, this cardboard tube is one long hole with various holes along the way so children get glimpses of pellets racing down the tube.  In addition, the holes along the way offer the children multiple entrees into the tube for their own operations.

There are actually more holes in the concrete forming tubes.  There the three large holes at the top of each concrete tube.  Each concrete tube also has two small holes at the bottom.   You can only see one in the picture, but believe me, they each have them as outlets for pellets dumped into the top of the big tube.  There are also the holes that accommodate the clear plastic tube, which can be thought of as one long hole with a top and a bottom.
There is one more hole in the tallest concrete tube that is hidden.  It is a small round hole just below the silver rod.   And no matter where it is or what size it is, the children will find it.
I originally made this hole to stabilize the large tube.  I did not need it, so I forgot about it until I saw this child reaching through the hole for pellets to put in his plastic measuring cup?  Why did he reach through the hole to get pellets when it would have been easier just to reach down to grab some pellets from the table?

Do you know that children measure holes? They measure holes in many different ways.  One way they measure is to use their own body.  

Here are pictures of two boys using their hands and arms to measure the respective holes.  The one on the left reaches across two holes.  The child on the right reaches down into the clear tube.  Both are measuring size and length of the holes.  Can a hole have a length?
Another way they measure holes is with the loose parts they find on shelves near the sensory table.  An example is the child who finds a bottle that fits nicely into one of one of the holes so he can empty the pellets from his bottle.
In a way, this is like a 3-D puzzle.  Will the bottle fit into this hole?  And like a puzzle, when it fits, there is a certain satisfaction and a foundational experience with geometry.

Two other children find a clear plastic tube and discover that it fits through two holes horizontally. 
Besides measuring the holes, these children are also altering them.  The two holes in the cardboard tube have now become one long hole with two ends.   Of course, they measure each end of the hole with their hands as they reach in to retrieve pellets.

Not only do children measure the size and shape of holes, but they also use holes to measure volume.  The children pictured below filled up the shortest concrete tube. 

They are able to do that because the holes at the bottom of this concrete tube are buried in pellets.  How many pellets fit in the big tube?  A lot!

The clear tube embedded in the two taller concrete tubes is easier to fill.  Also, because the tube is clear, the children are able to follow the progress of the tube filling up. 
Adding volume becomes a dynamic process.  The opposite is true, too.  Watch as one child empties the clear tube of pellets.  She starts out slow, but once she realizes her progress, she is going to get every last pellet out of the tube.


If we are using math terms, this could be considered subtracting volume. 

Children need holes.  They do not need holes for math, but holes and math go together quite nicely.  If you do not believe me, I took an informal poll and the "eyes" have it.


Saturday, December 5, 2015

CONCRETE FORMING TUBE APPARATUS

When I find myself in a large hardware store, I often meander a bit looking at the materials with an eye for something to use in the sensory table.  This past summer, I found concrete forming tubes.  These tubes are used to set posts in concrete.  The tubes I found were 4 feet high and 8 inches in diameter.  My initial thought was that these tubes were big enough to hold other, smaller tubes.  With that beginning spark the Concrete Forming Tube Apparatus was born.

I bought two concrete tubes.  One I did not cut; the second one I cut so I had two pieces, one 2.5 feet tall and the other 1.5 feet tall.  That way, when I placed them in the table, they formed a gradient.  On that gradient, I set a long cardboard tube by cutting slits in the top of each concrete tube.  I taped the cardboard tube to the concrete tubes to hold it in place.

In addition, I embedded a clear, plastic tube through the two tallest concrete tubes.  The clear tube emptied back into the table right next to the smallest concrete tube.

Because this is a vertical piece, I needed to make sure it was secure so it would not topple over when the children grabbed onto it.  I taped three rods that spanned the width of the table to the lip of the table.  I then taped the concrete tubes to the rods for stability.  I also taped the cardboard tube to the lip of the table.
That still did not make the apparatus stable enough.   Before I added the pellets, I taped each of the concrete tubes to the bottom of the table.  Surprisingly, taping the bottom of the concrete tubes to the bottom of the table was enough to finally make the apparatus child-worthy.  And child-worthy it was.

I want to end with a word of caution.  If you build an apparatus vertical, the children will go as vertical(high) as the apparatus.  Watch.

Going vertical from Thomas Bedard on Vimeo.

Two children climbed up on the lip of the table to reach the highest point of the apparatus so they could pour pellets down the cardboard tube.  You may have noticed that when they climbed, they grabbed onto the tubes which tested the stability of the apparatus.  The apparatus moved slightly but stayed secure in the table.  Would you be comfortable with that?  If you would not, build only as high as your comfort level.

Just to be clear, when I build this high, I am making moment-by-moment decisions about safety versus benefits.   I do get a little nervous when they climb high, but then I move close enough to gauge how each child is measuring their own risk level.  If they are doing a good job of measuring their own risk, then I begin to see the benefits: they are building their strength, balance and coordination in ways they author themselves.  All their neurons are firing; they are building brain cells.  At this point, the benefits far exceed the risks so I am able to relax a bit and let them climb. 

Saturday, November 28, 2015

SWAMP III

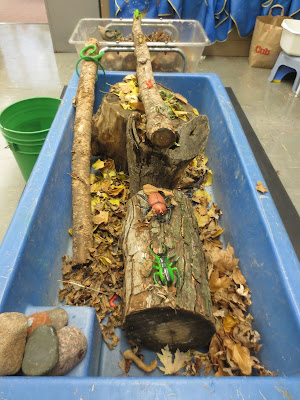
I used to set up a swamp every fall in my sensory table with leaves, water, and plastic bugs.  In 2011, I added big sticks and a log.  That became Swamp II.   Since that time, I have not written about creating a swamp.  I felt it was time to bring back the swamp to infuse some new elements from nature into the classroom.  For Swamp III, I brought in stumps, logs, big sticks, rocks, and leaves.
To the natural elements, I added realistic plastic bugs, beetles, frogs, and snakes.  The swamp was not complete, though, until I added the water.

Children approached the swamp in many different ways.  Some children dug right in and others used the tools and implements to explore what was in the table. 

The child below used tongs to handle a plastic brown snake she plucked out of the swamp.


The children lifted and held the logs and sticks much like they would have if they were to find them in the woods or on the beach. They got to feel their weight and texture.   


One child experimented with balancing the logs and sticks on each other using the small table as a base.

Another child went so far as to take all the logs and sticks he could lift out of the table and pile them on the floor.
These logs and sticks were all different; they were not uniform in shape, size, or weight.  Handling each one was a different exercise in strength and balance.  There was also an aural component as the child dropped the stump onto the pile and hit the other pieces of wood on the pile. 

Another child even tried to lift the second heaviest piece out of the table.  It was a maple log that was quite heavy.  Watch.


I was terribly conflicted when I made this video.  I knew the log was heavy, too heavy for him to lift it safely out of the table.   I was afraid he would loose control of it and it would drop on his leg or foot. On the other hand, I wanted to see if he could measure his own strength accurately.  About midway through the video, the camera frame rose so I lost part of the action.  That was because I needed to move in closer in case I would have to help.  In the end, he decided for himself that the log was too heavy to lift.  Instead, he rolled it over the stump to the other side of the table.  In doing so, he took care that he never lost control of the log as it rolled.  Not only did he demonstrate that he could measure his own strength, but he demonstrated that he could control this heavy log to the end of his operation.   

Just think of all the things that could have happened in this episode.  I ask you now: Was it too dangerous for the classroom? Was the risk worth the benefit?

From the dangerous to the prosaic. Children scooped the water and leaves to make their own concoction.  One group took to calling the swamp water "toilet water."  You can imagine the silliness that ensued around this potty talk.


The plastic animals provided some children with an avenue for role playing.  The child pictured below animated the family of frogs she collected on the stump.

In essence, this is a science table.  Not the kind of science table that is a display for the children to look at.  No, this is a science table for the children to actively engage in exploration.  It is true that it is a contrived space that is a poor imitation of nature, but the children are still able to conduct personal investigations in the spirit of science in which content and process are inseparable. 

Saturday, November 14, 2015

THE SCIENTIST

In the March 1994 issue of the Child Care Information Exchange, Loris Malaguzzi wrote:
"We need to produce situations in which children learn by themselves,
in which children can take advantage of their own
knowledge and resources autonomously... (p. 54)"

In a recent piece from the Bing Nursery School at Stanford, Colin Johnson wrote:
"...through the lens of inquiry—of valuing internal, cognitive interactions 
with materials—playing with water is the perfect foundation for scientific thinking 
because it increases children’s tendency to spend more time 
noticing, wondering and exploring."

I want to share a video with you that illustrates both of these points.  I took the video as I watched a child explore one section of a recent apparatus: Trash Bin II.  
The section the child explores in the video is the bin on the left with the funnels and black hoses.

The hoses drop into the bin from the funnels; exit about midway down the bin; and are strapped around the outside of the bin.  
Because the paths of the hoses are partially hidden within the apparatus, a child has to do some research to understand how the apparatus works.

The video shows one child at the sensory table.  There were many more earlier, but this child has been at the table for at least 30 minutes trying to figure out where the water comes out when he pours it into each and every tube and funnel.  

As the video starts, he is looking at the water trickling out the black hose near the bottom of the right side of the left bin.

He scoops some water in his plastic measuring cup from the table to pour into the beige funnel.  In the process of pouring he says: "Watch this one come out."

He is already anticipating where it will come out, so when he pours, he immediately looks to his right to the bottom of the bin on that side.

He steps off his stool and crouches down to watch the water come out of the hose.

At this point, something amazing happens, he starts to trace the paths of the two hoses with his eyes and his hands.   He first traces the hose that has the water coming out.  He realizes that there is a second hose.  He points up at the black funnel and says that it goes around here... 

...as he continues tracing the second hose with his hands and his eyes.
Here is the video clip.

The child is not talking to me.  He is verbalizing his thoughts as he is executing them.  This child is constructing knowledge right before our very eyes.  He is learning by himself through internal, cognitive interactions with the materials.  Or, does his external, physical interactions with the materials usher in the internal, cognitive interactions with the materials?  Or, is there an interplay between the two that can't---or shouldn't---be separated?  Or, does one augment the other in an intricate dance.  In any case, his thinking is clearly visible in the movie clip .

I showed the video to the child's parents.  They realized very quickly what their child was doing and were duly impressed.  That is all the more true because whenever they would ask him what he did in school, he would basically say nothing.  The parents now have a different picture of their child at school.  They now have a picture of him as a competent scientist.

I will be taking a week off from my blog.  I will be at the NAEYC national conference in Orlando this next week.  If you are interested in hearing about building apparatus in and around the sensory table, I am on the docket for 8:00 Thursday morning.