Last October I wrote about BOX TOWERS here, here, and here. I finally got around to making my yearly BOX TOWER a few weeks ago. I have tried to do a better job of documenting how I built it. For this tower, I used three different size boxes that I could stack on top of each other.
I first cut a hole in the top of the largest box.
I duct taped the flaps.
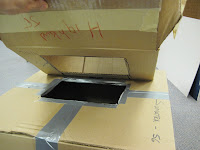
I took the second box and made marks for the length of the hole on the bottom of the second box to match the length of the hole on the top of the bottom box.
I took a piece of cardboard to match the width of the hole on the bottom box and made a mark on the two ends of the cardboard piece. That process gave me marks for the height and the width of the hole from the bottom box on the second box.
From the marks, I filled in lines to make the rectangle I would cut out for the bottom of the second box. I roughly centered it and then cut out the rectangle.
I then matched the two holes for taping.
I taped the boxes together. Notice that I kept the flaps open on the second box. That made it much easier for me to reach inside to tape the holes together for a strong bond between the boxes.
I repeated the same process to attach the top box to the second box.
Once the holes are taped on the inside the boxes with the duct tape, I taped the flaps shut and I cut holes in the sides of the towers on the different levels. As I cut the holes, I pulled the flaps out.
I trimmed the flaps with a box cutter.
I taped the flap I trimmed to the adjoining box. This, too, contributed to a secure bond.
I also taped all the joints were the boxes meet to make an even more secure bond. My experience tells me the children will test the strength of any given apparatus.
This year's installment of the BOX TOWER was called DINOSAUR MOUNTAIN.
I used animal bedding with this activity. The dinosaurs are animals, after all.
I also built a bridge with a wooden tray.
The bridge connected the sensory table with a smaller table that holds many of the utensils we use in the sensory table. It also extended the sensory table and provided an additional dimension for play and an interesting area for transporting to and from.
Just a quick note: animal bedding gets all over the room because it is light and sticks to clothes. Just ask Addie.
This is a blog for early childhood teachers looking for ways to expand and enrich play and learning in and around their sand and water tables with easy-to-make, low-cost apparatus. It may also be of interest for anyone who appreciates children's messy play.
About Me

- Tom Bedard
- Early childhood education has been my life for over 40 years. I have taught all age groups from infants to 5-year-olds. I was a director for five years in the 1980s, but I returned to the classroom 22 years ago. My passion is watching the ways children explore and discover their world. In the classroom, everything starts with the reciprocal relationships between adults and children and between the children themselves. With that in mind, I plan and set up activities. But that is just the beginning. What actually happens is a flow that includes my efforts to invite, respond and support children's interface with those activities and with others in the room. Oh yeh, and along the way, the children change the activities to suit their own inventiveness and creativity. Now the processes become reciprocal with the children doing the inviting, responding and supporting. Young children are the best learners and teachers. I am truly fortunate to be a part of their journey.


Your tower is really wonderful!
ReplyDeleteThank you. The best thing about the apparatus is how the children animate it.
ReplyDeleteNow this looks like a wonderful center for children to spend countless hours to use their imaginations!
ReplyDeleteThanks so much for instructions!!
Brenda
Addie is looking adorable!! Too bad Elliot missed this class. :)
ReplyDeleteI love your tower and especially the photo of the dinos escaping over the bridge. My daughter is a big dinosaur fan and made her own cardboard box world for them to live in - it's much smaller than yours but has a few added attractions - I thought you might like to see it http://nurturestore.co.uk/make-a-dinosaur-land
ReplyDeleteCathy, I checked out your dinosaur land. Like all good homemade things, the children are the engine that make it go. It was an interesting comment about the dinosaurs escaping over the bridge. I hadn't thought of that. In one of my classes, it was a place for the dinosaurs to hang out, to get buried in bedding, and to be fed.
ReplyDeleteHi I have enjoyed reading through your blogs & it's great to see a man in this field as you have so much to offer. I'll be trying some of your ideas at my sand tray next term, thanks for more inspiration :)
ReplyDeleteKierna, thanks for the nice comment. I have been building apparatus for the sand tray for almost 25 years, so there is more to come. Early childhood teacher is the greatest job in the world.
ReplyDelete