About Me

My photo
Early childhood education has been my life for over 40 years. I have taught all age groups from infants to 5-year-olds. I was a director for five years in the 1980s, but I returned to the classroom 22 years ago. My passion is watching the ways children explore and discover their world. In the classroom, everything starts with the reciprocal relationships between adults and children and between the children themselves. With that in mind, I plan and set up activities. But that is just the beginning. What actually happens is a flow that includes my efforts to invite, respond and support children's interface with those activities and with others in the room. Oh yeh, and along the way, the children change the activities to suit their own inventiveness and creativity. Now the processes become reciprocal with the children doing the inviting, responding and supporting. Young children are the best learners and teachers. I am truly fortunate to be a part of their journey.

Sunday, March 30, 2014

NOT ANOTHER BOX TOWER


For the entire month of March, I wrote about box towers and play associated with this type of apparatus.  You can find those posts hereherehere, and here.  Can there really be anything else on box towers?

Yes, I have another box tower to show you.  This tower is formed by stacking boxes on top of each other to create a step or pyramid type structure.
As you can see, three boxes form the base, two boxes the next level and one box the top level. The boxes are approximately the same size so it was easy to tape them all together to make one unit.  (Can you tell from where I acquired the boxes?)

The impetus for building this apparatus was not that I wanted to build another box tower. Rather, I wanted to take advantage of some flat cardboard pieces I have been saving for over a year.
I cannot remember when and where I found eight of these small pieces of flat cardboard with precut holes.  I could not pass them up, though, because of the symmetry of the holes and the strength of the pieces.  The cardboard pieces are four ply, which means they have four layers of cardboard glued together which makes it much stronger than single ply cardboard.

When I was in the liquor store recently, I noticed that the tops of empty liquor boxes looked like they would match the dimensions of the cardboard pieces I had been saving.  (Did you guess the boxes were from the liquor store?  I did not cover up the writing on the boxes, but when I borrowed them to a colleague, she had to cover up any reference to booze on the box. Why?  Should I be more aware of the incidental environment I am creating?)  They were, in fact, a good fit so I was able to tape the cardboard pieces to the top of the boxes.

There are two other features of note about the structure itself.  First, all the holes in the top box have a clear view to the bottom of the structure, which is the bottom of the table.

Second, the second level has an inside ledge that is formed by covering the cardboard circles on the inside of the two outer boxes that are part of the base.

Those features make the structure more interesting, not only because they allow the children to work inside the structure, but they allow the children to work on multiple levels.

And where did that car go?


P.S.  This post is a day late because I was invited to Spring Valley, MN to do a Saturday morning workshop with early childhood educators and parents from the area.  I am always impressed at people's willingness to enter this process of building and creating unique structures to go at the sensory table.  I need to give a special thank you to Ann, the Early Childhood Family Education and School Readiness Director, for inviting me and making all the arrangements and being such a great host.


Saturday, March 22, 2014

SENSORY IS SOCIAL

Most of the posts on this blog are about apparatus that are built for the sensory table. Lately I have been writing a lot about Box Towers, the latest of which is a Dinosaur Tower.

Though I write a lot about the physical operations the children come up with as they explore the apparatus, there is much more happening in other areas of development such as social development.   To illustrate this point, here is a simple story told in pictures and words that happened recently at this apparatus.  To understand the story, you need to know there are holes on opposite sides of the tall tower.

A playful gesture

Reciprocated

Creates a play connection

That is recreated anew in another part of the room.

THE END
(but not really)  

Saturday, March 15, 2014

DINOSAUR TOWERS-LEDGES

The last two posts were Building a Strong Box Tower and The Box Tower as an Invitation to Play. This past November, I built another box tower and outfitted it with dinosaurs and Jurassic Sand. It was actually two box towers connected by a "bridging box."
Box tower 1 is in the blue table.  It is made of three boxes, one on top of the other.  Building of this tower is the same as that of a previous tower that was built in 2011 called Dinosaur Mountain. The second tower is a tall box embedded in a shorter box much like the Strong Box Tower. The bridging box is a long rectangular box set horizontally and forms a tunnel between the two towers. The bridge has holes on top and on each side.  One end rests on the tower in the blue table; the other end is embedded in tower 2.

Here is a view from the other side of the apparatus.  As you can see, there are plenty of holes on all different levels.

This apparatus is called Dinosaur Towers because, besides loose parts like rocks and sticks, dinosaurs were provided as part of the provisions.

Like any good apparatus with holes, everything gets put in the top hole and falls into a pile on the bottom.

Instead of highlighting the play with the dinosaurs or the holes or even the bridge, I would like to highlight a feature of the apparatus that can be easily overlooked: the ledges created by the boxes stacked on top of one another.

Here is a picture that shows the multiple ledges created by this apparatus.  The tops of each of the towers and the bridge can also be considered top ledges.

Children find these ledges and take advantage of them to form their many and varied operations. Let me highlight just a few.


In the case of the dinosaur towers, the ledges create narrow platforms on which the dinosaurs tangle.


A ledge can also be a place on which a child can set his cup as he attempts to step onto the lip of the table so he can pour sand through the top hole of the dinosaur tower.
In fact, I am curious how this child would have managed this operation without the ledge.

The ledge also turns out to be an inviting place to put the sand.  A child does not always need to transport into a container; sometimes a ledge works just fine.
Do you notice the trail of fingers on the lower ledge where a child or two have brushed the sand from that ledge.

That is a nice segue to the next picture.  Below you see a child brushing the sand off a ledge with her hand.
Notice that the child is reaching through two holes to brush the sand off the edge.  That is noteworthy because for her to complete this operation she has to know where her arm is even though she can't see all of it.  It sounds simple to us, but she is working on her proprioception. Doesn't that sound impressive?

There is one more ledge operation to highlight and it is similar to the one above except this one uses a tool: a little broom.

Sand cascade from Thomas Bedard on Vimeo.

There are two aspects of this operation that are significant.  The first is that the child is able to create a cascade of sand  as he brushes the sand from one level to the next.  Second, he shows an amazing amount of broom control so not much sand---if any---falls on the floor.

I have long contended that children will find all available spaces in and around an apparatus.  I have overlooked ledges far too long.  Not any more.  I can now see they are important spaces for the children and their operations and will dismiss them no more.


Saturday, March 8, 2014

THE BOX TOWER AS AN INVITATION TO PLAY

Last week's post was about how to build a Strong Box Tower.   This is a very simple apparatus that serves as an invitation for the children to play.

The invitation is not complete until other objects, tools and loose parts are provided through which the children can interface with the apparatus.  Farm animals with animal bedding inhabit this particular Box Tower.
In addition, there is the ever present pail; a wooden tray that serves as a bridge between the blue table and the smaller clear table; and the tub underneath the wooden tray for catching the falling animal bedding so not all of it ends up on the floor when the children are using the bridge for their play.

This a a very simple apparatus: a box inside a box with holes.  How do children make any meaning out of this invitation?  This is a question that spawns many others.

One of the ways to make meaning is to animate the holes.  The holes are places into which stuff is put to make things disappear and sometimes to see where they go.  Below is a video of two children putting something in the top hole.  The first child has a horse and she pretends the horse is galloping and then falls in the hole.  Watch her expression as she completes her actions.  Why is she so pleased with making the horse disappear?  Is this a good magic trick?  The second child steps up on the stool as the first child steps down.  He drops some animal bedding down the top hole.  He then checks the hole on the side to see where it went.  What makes him curious about the trajectory of the animal bedding?  One child is happy with a disappearance and another wants to know where something goes.  Why the difference?

Dropping things down the hole from Thomas Bedard on Vimeo.

Another way the children make meaning out of this invitation is simply to explore and operate in all the spaces provided by the apparatus with the provisions.
When you look at the picture, you can see six different children on multiple levels in various spaces.  This is just a snapshot in time, so you have to imagine the children moving through time and space.  For instance, the child sweeping the floor will move around the child in the yellow dress to empty her dustpan.  The boy standing on a stool will soon drop the horse in the top hole while reaching over the other boy who bends down to gather some animal bedding from the bottom of the blue table.  Do they understand that they are working through time and space on the various levels in conjunction with others?  How do they think about that?

Some of the meaning is easier to surmise.  When a child sets up a feeding station for the horses, that is pretty evident.

Although feeding your horse can also be an experiment in how high can one stack the light and fluffy medium that is the feed for the horse. 
At what point did this change from feeding-the-horse to a pile-as-high-as-I-can activity?  What prompted the change in the direction of the activity?

When a child balances the animal bedding on a round rock, what is the purpose?  Is it enough to say he is experimenting with the properties of the materials and how they conform to each other?

How do children think to use the rocks to form a frame to hold the animal bedding to create a bed for the cow?  Whose idea was it and how did the others join the project?
Do I ask the children?  Or do I relish the elemental beauty and care the children take in their work?

An invitation is just an invitation until the children actually accept it.  Once they accept it, though, it takes on a life of its own depending on what each child individually and in concert with others brings to the play.  We can make some guesses as to the direction the play will take.  For instance, if there are  animals and animal bedding, the children will pretend to feed the animals.  

However, if apparatus and materials are open-ended and non-scripted, there will inevitably be questions of "What were they thinking?" 

Do we ask?  Or do we savor---and smile?


Saturday, March 1, 2014

BUILDING A STRONG BOX TOWER

I usually do not post detailed instructions about how to build an apparatus.  However, I have had a couple of inquiries lately asking how to make a construction that is not easily destroyed. Because of those inquiries, I decided to recreate one of my first apparatus so I could document how I built it strong enough to withstand the onslaught of the ultimate testers, the children. The apparatus is a Box Tower and you can see the original post here.

Let's start with a picture of this year's finished Box Tower.  There are two boxes.  One is tall and the other is a rectangular box which serves as a base.  The tall box is embedded in the base box.


First, I place the tall box on top of the base box so I can trace its bottom dimensions onto the base box. The tracings mark the square I will cut so the tall box will fit into the base box.


I cut out the square on the base box.  As you can see below, there are inside flaps that the utility knife does not cut.  Those inside flaps are important for the strength of the box, so I do not remove them.


Rather, I notch the inside flap so it matches the opening and then I tape it to the top piece of cardboard thus increasing the structure strength at this level.

Since I have the opening in the base box, I tape down the flaps on the bottom of this box.  They are easy to reach at this point in the construction.  One reason to tape the flaps on the bottom down is to give the box strength.  In addition, by taping those flaps down, the medium---sand or whatever---will not get caught under those bottom flaps.


The next step is to cut holes on two sides of the tall box at the bottom.  Since the children will be putting stuff down the holes of the box tower, these holes will serve as outlets.
This hole is cut before dropping the tall box into the base box.  Notice that only three sides are cut out and that there is a flap that hangs over the box.


I trim the flap so it does not hang over the edge because when I drop the tall box into the base box, the flap will fit inside the structure.  I then tape the edge of the flap to give it strength and tape the bottom flaps of the of the tall box.


Before dropping the tall box into the base box, I cut holes in the bottom sides of the base box to correspond to the holes of the tall box.  Again, the hole is only cut on three sides so there is a flap the comes out.  These flaps that fold down and out from the holes are important because they are used to tape the box down firmly.


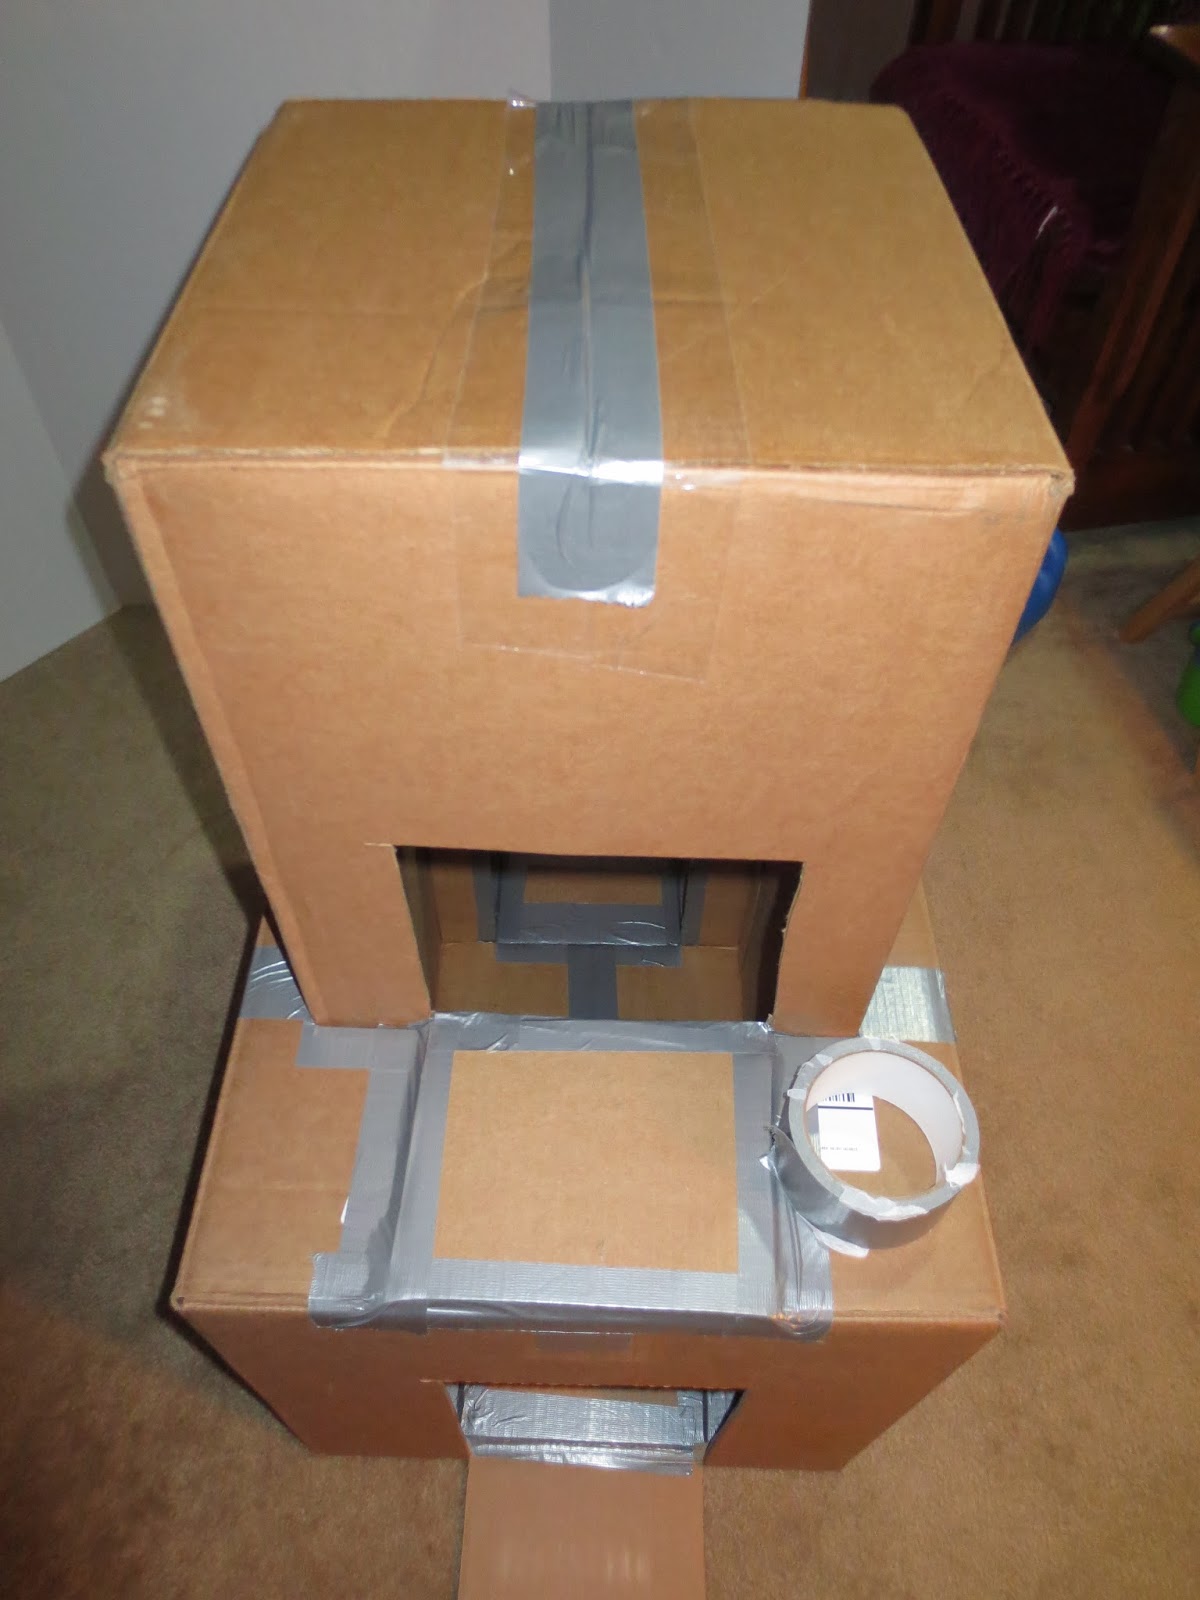
When the tall box is dropped into the base, an inner chamber is formed.  At this point, the flap of the tall box is taped to the bottom of the base box making it firmly attached to the base box.


With the tall box inside the base, I cut a hole in the tall box where it meets the base box.  The hole is only cut on the top and two sides.  At this point I have not taped the top of the tall box so I can reach in and push out the cut hole out from inside so there is a flap again.


I tape the new flap to the top of the base.  By doing that, the embedded box is secured for a second time onto the base box.
As you can see, it is possible to tape the top of the tall box shut at this point.


I make one more cut on top of the tall box.  Since children will always find the highest level of any apparatus, it is important to have a hole on top for them to drop things into the Box Tower.


The box tower is now ready to be taped to the table.  I use the flap from the bottom hole to offer more surface for taping the structure securely to the table .  Tape is also used all around the bottom of the apparatus.

Here is another view of how the sides of the base box are taped to the table.
This makes a surprising stable apparatus even though it is oriented on a vertical plane.  Children can put a lot of force by pushing the top of the box, but this thorough taping keeps it in place.

Now for the provisions.  This year I used wood shavings that a parent donated.  I also added farm animals. The invitation to play is complete---and strong and secure.

If you want to see another version of the Box Tower, check out Box Tower 2.  This version is also strong, but built differently.

My hope is not that you build the exact same Box Tower.  Rather, take the ideas for connecting and taping the boxes together to make your own apparatus strong and secure.  When you start to build, you will see there is no one way to put the elements together.  The fun begins when you connect the properties of the materials with your imagination.