About Me

My photo
Early childhood education has been my life for over 40 years. I have taught all age groups from infants to 5-year-olds. I was a director for five years in the 1980s, but I returned to the classroom 22 years ago. My passion is watching the ways children explore and discover their world. In the classroom, everything starts with the reciprocal relationships between adults and children and between the children themselves. With that in mind, I plan and set up activities. But that is just the beginning. What actually happens is a flow that includes my efforts to invite, respond and support children's interface with those activities and with others in the room. Oh yeh, and along the way, the children change the activities to suit their own inventiveness and creativity. Now the processes become reciprocal with the children doing the inviting, responding and supporting. Young children are the best learners and teachers. I am truly fortunate to be a part of their journey.

Saturday, October 8, 2016

Inspired

I did not think I would get around to doing a post this week because I did an all-day workshop yesterday in Belton, Missouri.  Belton is seven hours from my house in Minnesota.  I went down on Thursday afternoon and returned on Friday night.  I was gone from home for 33 hours, 14 of which was on the road.  I thought I would be too tired to write this week.

I was tired for sure, but as it turned out, I was also inspired by the people and their efforts at Grace Early Childhood Center in Belton.  So much so that I have to share some of the inspiration.

For this workshop, the participants had to build after I presented them with a framework for building apparatus in and around the sensory table.  In addition, I presented them with axioms of how children play around the built structures at the sand and water table.  (The framework and the axioms are in the right-hand column of this blog.)  In anticipation of the workshop, they had collected all kinds of materials such as cardboard boxes, cardboard tubes, PVC pipes, guttering, etc.

As the participants started to build, I could not help but think that this was really a pop-up adventure for these teachers.  Here is a picture from a pop-up adventure for children from my retirement party last June.  The children could build anything they wanted with the materials on hand.  Adults were there to help only if a child asked.

Here is a picture from yesterday's workshop.  In this case, the adults could build anything they wanted from the materials on hand.  I was there to help if asked.  

They pursued possibilities.

They played with unique configurations.  This group actually took the liner out of the
 sensory table to use as a receptacle for stuff coming out the clear tube from the white box in the 
table.  And, they fitted the drain hole with a tube for the children's experiments in 
theorizing and testing: "where does it go?"

 Some even ventured to use power tools for the first time.

They even made some very unique elements for their constructions.  On the left is a PVC connector taped into a bottle.  When the child pours
into the bottle, which end of the connector will it come out?  On the right is a bottle taped into the
 bottom of another bottle.  
In essence, it is a 
homemade funnel emptying into 
another homemade funnel.  Brilliant!


  They even got to theorize and then test their theories 
about how their apparatus really worked.

I arrived in Belton on Thursday night after dark.  It is always a little disconcerting for me to arrive in a new place at night.  On top of that, I arrived in a storm.  It was raining hard.  There was a lot of lighting and thunder.  The wind was blowing hard.   The next day at the workshop when I reflected on the disquiet I felt coming into this new place just the night before, I could not help but think that some of the staff at Grace Early Childhood Center might be having some misgivings about going to this new place of building to which they had never been before.   During the course of the workshop, several even mentioned that they were not comfortable with the building process.  Despite not feeling comfortable building, they made 17 different apparatus for their tables.  Not only was I inspired by their ingenuity and their imagination---no two apparatus were the same---, but I was inspired by their effort to throw themselves into this endeavor for which there was no blueprint, nor specified outcome.

I want to thank Jan for inviting me down to do the workshop.  I also want to thank both Jan and Jill, the principal, for making me feel so welcome and to make sure I had everything I needed.  And, I want to thank the staff at Grace Early Childhood Center for playing along---and inspiring me. 


If you are going to the Washington AEYC conference at the end of October in Seattle, you can see my presentation on sand and water tables in on Saturday morning the 29th from 9:00 - 10:30.  If you are going to the NAEYC national conference in LA, you can see my presentation on Thursday afternoon November 3rd from 1:00 - 2:30.  

Saturday, October 1, 2016

Pool noodles

People often ask me how often do I change the apparatus in the sensory table.  My answer is that I change it every week.  Sometimes it is a wholesale change and sometimes I only change what gets attached to a base that I will use for more than one week. The base pictured below was so good I used it for three consecutive weeks.
The base was a white wooden tray (made from scrap wood from my basement) that spanned the width of the table.  I duct taped it to the lip of the table on each side.  I then duct taped the green crate to the wooden tray.  I purposely taped in on the end that would give the most height to the apparatus.  The height allowed me to create a suitable incline for the PVC pipe in the first apparatus which was a worm slide. Since the crate has holes, I was able to thread flexible tubing through the crate adding a bit of intrigue to where the worms would end up. 


In addition, the wooden tray section of the base offered a unique space in which the children could pour hands-free.  The crate in the middle created two of those spaces, one on each side of the table.


For the second week, I used the same base to secure a rocking chair waterfall to the sensory table.
I did rearrange the flex tubing and added another PVC pipe, but the waterfall ramp was the new deal.

The third week, I kept the rocking chair waterfall, but I replaced the flex tubing and the PVC pipes with pool noodles, three to be exact.  One noodle was shorter and more sturdy.  I taped that noodle(the middle one) vertically onto the crate and the wooden tray.  The end standing in the table was taped so the only exit for water that was poured into the blue funnel was through the holes that were drilled in the noodle.  The two thinner and more flexible noodles were threaded through the crate and taped both to the back of the crate and the lip of the table near the brown planter tray.  The noodle on the left was left open at the end so when a child would pour water into the black funnel, the water would empty into the smaller clear table.  I taped the end shut of the noodle on the right so when a child would pour water into the red funnel, the water would squirt out the holes in that noodle.
There are a couple of things to note from this picture.  The first was that the height of the apparatus allowed for some good, tiptoe trunk extension.  The second was the number of different funnels both in size and shape.  The black one is used for changing fluids in cars.  The red one is just huge, the biggest I have found.  And the little blue one has a surprise: its own flex tube.

I provisioned turkey basters for play with these noodles.  It was not long before the children figured out that they could plug the holes with the turkey basters.
And with the holes plugged with turkey basters, they could fill the red funnel to capacity.  When they filled the red funnel to capacity and they pulled the plug, they got a nice surprise: water gushing out of the noodle into the brown planter tray.
I actually drilled the holes in the noodles with a drill.  I did not know how big I should make them or even how many.  I started with small holes and tested the apparatus.  Four holes were too many so I taped over two and that worked well.  I kept the smaller holes, but to my surprise as the children tried to fit more things in the holes, the holes got bigger.  As the holes got bigger the stream of gushing water got bigger.  Some water even ended up on the floor, oh my!  But what fun!

FYI: I do not plan to blog next week because I travel to Missouri to do an all-day workshop on Friday for a public school EC program.  This is a workshop in which I offer a framework for building in and around the sensory table and the participants get to build their own apparatus.  It is almost like a pop-up adventure play event for adults.  Also, at the end of October, I will be presenting on sand and water tables in Seattle at the WashingtonAEYC conference.  My session is on Saturday morning from 9:00 - 10:30.  The following week I am LA for the NAEYC national conference.  My presentation for that conference is Thursday afternoon from 1:00 - 2:30.  If you plan to be at either of those conferences and you get a chance, stop by and say hi.
 

Saturday, September 24, 2016

PVC pipes and flex tubing

Two weeks ago I wrote about an apparatus I called the rocking chair waterfall.  I called it a rocking chair waterfall because it was made from bentwood parts of a rocking chair.


The bentwood pieces gave the apparatus the curve.  I attached a toner deposit with holes drilled in the bottom to direct the flow of water down the curved incline to produce the waterfall effect.


I attached the apparatus to a base that consisted of a wooden tray and a green plastic crate.  The tray spanned the width of the table and was duct taped to the lip of the table.  The green plastic crate was then taped to the tray.

Because this was such a good base, I could not pass up the opportunity to add more things to the base on the opposite side of the waterfall apparatus.  The crate allowed me to set up some PVC pipes on an incline and the holes in the crate allowed me to thread some flex tubes into a simple tangle inside the crate.
PVC pipe #1 was taped on an incline so it emptied into the brown planter tray attached to the smaller clear water table.  PVC pipe #2 wast taped to the side of the crate on an incline.  A clear plastic tube was taped to it so it emptied into the clear water table. Flex tube #1 started at the top of the crate and wound its way through the crate, along the outside of the crate and then under the wooden tray to empty back into the blue sensory table.  Flex tube #2 started at the top and immediately exited through the front of the crate and ran along its side to empty into the black tub at the end of the table. Here is a closer look inside the crate to see how the flex tubes were arranged.

Pouring water down the flex tubing made for a more intriguing operation.  Pouring water became an opportunity for the children to create a theory about where the water goes.   That was not so obvious because when a child poured water into one of the tubes, the tubes actually crossed paths inside the crate.  Watch how one child tried to figure out where the water went when he poured water into one of the tubes.   When he first poured the water into the tube, he stepped down to look see if the water came out the tube on the other side of the table next to waterfall apparatus.  He was not entirely convinced that was where the water came out, so he proceeded to look at the tubes in the crate from various angles: from below, from in front and from the side.  He came up with a theory that the water emptied back into the blue table from the tube under the wooden tray.  His actions became more purposeful because as he poured, he focused on the end of the that tube.


His theory was wrong.  Just to be sure, though, he grabbed the end of the tube under the wooden tray and bent it down just to see if any water came out.  Eventually he figured out the path of the water through the tubes through more theory building and testing.

To be sure, children also know how to make pouring down a straight incline intriguing, too.  Take for example this child who decided to see if he could both pour and catch the water down the PVC pipe at the same time.
This child knew the water went down and out the pipe because he had poured water several times into the top of the pipe to track the path of the water.  He then challenged himself to see if he could do two operations simultaneously.  Is that a self-reflexive theory?  In any case, he could.

I often tell people that my sensory table is my science table.  Children are constantly creating theories about how the physical world works and testing those theories in real time.  Some theories are not confirmed and some are.  The important thing is the process of experimenting. 

I would like to leave you with a photo of a discovery made by a child at the table with this apparatus.  The thing is, the discover relates to axiom #7 in the right hand column of this blog:  Children will always devise new and novel activities and explorations with the materials presented that are tangential to the apparatus itself.
Besides that his hand looks orange, can you guess what this child has discovered through the process of experimenting with this bottle of orange water? 


Saturday, September 17, 2016

Where do my ideas come from?

This is not a post about how I come up with ideas for building apparatus.  Rather, this is a post about the process of writing this blog and what I choose to write about.  It follows directly on the heals of my last post which asked the question: How do children express their ideas?  The inspiration for that blogpost came from the Family Time blog of the Huffington Post UK.  The title of the November 15, 2015 blogpost was: How art and play can work wonders for your child's development.  One sentence from the blogpost stood out to me when the author quoted Sarah Cressall, a person who promotes art and craft workshops.  The sentence reads: "If we only teach our children information, we are failing them.  We need to equip them with the skills to explore ideas, and to have the confidence to experiment, problem solve and work out their own solutions."

I actually latched on to only one phrase in that quote: "We need to equip them with the skills to explore ideas..."  My first reaction was that the children already have the skills to explore their own ideas, they just need the time, space and materials with which to explore---and express---their ideas.  I then asked the question: How do children express their ideas in the context of the sensory table?

At that point, I was not even sure what constituted the expression of an idea at the sensory table.  I have been in the field of early childhood long enough to know that so often what is valued as an expression of an idea is something that is representational, i.e., a drawing, a painting, a clay sculpture. In the act of exploration at the sensory table, though, how do children express their ideas?

I began to look over my documentation of a recent apparatus, the rocking chair waterfall.  In looking over the pictures and videos, the different ways the children used a watering can with a long neck caught my attention.  I was struck by they way they appropriated it for their own use mainly by asking nonverbal questions through their exploration of the watering can.  I thus equated the children asking questions to them expressing their ideas.  The expressions were truly in the fluid process of exploring, not in any product per se.

Since I found it fruitful to examine where my ideas came from, I wanted to further use the documentation to see if I could get some insight into where a child may have gotten just one idea.  The idea I decided to explore was the idea of using the watering can to plug the hole in the bottom of the brown planter tray.
The child on the right plugged the hole in the bottom of the tray with one of the maroon watering cans.  What could have possibly led to the idea of jamming the spout of the watering can through the hole of the planter tray?  Looking back on the pictures from that day, this is what I found.  The pictures are in sequence.

The child first explored pouring water from the watering can.  Interestingly, he used the hole in the top container of the rocking chair waterfall.  Of course, children by their very nature are compelled to put things in holes (Axiom #5 in the right hand column of the blog).
In the next picture, the boy had moved to the other end of the table and was closely examining how the water flowed out from the hole in the bottom of the planter tray.
In addition to examining how the water flowed out of the hole, he affected the flow by blocking the hole with his hand.
The next picture in the sequence had the child back exploring the watering can.  He took a funnel and placed it over the end of the spout of the watering can.  He then talked into the funnel to hear how this newly invented contraption changed the sound of his voice.  (Where did that idea come from?)
At this point, he again examined the water flowing through the bottom of the hole.  His careful examination of that hole allowed him to see the thin film of water created by surface tension.
The next picture in the sequence brings us right back to the one I started with, the one that prompted the question: For a child, where does the idea come from to plug the hole in the bottom of the brown planter tray?

Did I answer the question?  I think there can only be a partial answer.  I do think the pictures portray an irresistible narrative.  However, there are still too many things missing.  The sequence a pictures takes place over a span of 30 minutes.  Those snapshots can only capture moments.  Maybe there were more compelling actions in between the moments that I missed because my attentions still had to be on the whole classroom.  An example of a moment that was missed was the point at which he picked up the watering can and inserted it into the hole. Was the action an effort to poke a hole in the surface tension tension of the water covering the hole?  Even more intriguing are unknown factors that contributed to his disposition to examine and explore  Also, since the classroom and the sensory table encompass a social milieu, how did others nurture his quest to cultivate new ideas with the materials?

Thank you for indulging me as I played with these ideas.  I see playing with the ideas analogous to children playing with the objects and the setup and with each other.  Which leads me back to the end of the quote that inspired me in the first place.  None of this happens without "...the time, space and materials in which to explore ideas, and to have the confidence to experiment, problem solve and work out their own solutions."  In addition and more importantly, I am beginning to see the process of exploration and all that it entails as meaning making through our actions, either in our head or in our physical operations.

Saturday, September 10, 2016

How do children express their ideas?

Here is a question I want to explore: How do children express their ideas?  The question comes from the belief that in the field of early childhood education and care, most practitioners place a the greatest emphasis of children expressing their ideas verbally or through art activities like painting and drawing.  I hope I am wrong, but my question still becomes: Are there other ways to express their ideas?

To try to answer the question, I will focus on one simple object provisioned for a recent setup at the water table.  The object is a watering can with a long narrow spout.  What are some of the ideas children have when working with a watering can and how do they express them?  My conjecture is that children express their ideas through asking their own questions.

Let's start with an simple action.  In the picture below a child is using the watering can to fill a bottle.  Her idea, then, is to fill the bottle.  Even a simple idea like this harbors several questions if she wants to realize it. When is it full?  What happens if I keep pouring?  How do I coordinate my fine and large muscles to get the water into the bottle? 
She is asking her body to balance and stretch in such a way that it is not a given that she can fill the bottle.  For instance, can she lift her right elbow high enough to empty the watering can and fill the bottle?

With children, one question leads to another.  In trying to answer the question at hand, the children continually ask new questions.  Sometimes those questions are verbal but so often they are non-verbal and must be seen in their actions.  Here are a few more questions just from the children playing with the watering can.

These two children are each using the watering can to pour water into a hole in the side of the container for the rocking chair waterfall.  What happens to the water when it is poured into the hole?  What does it look like?  What does it feel like?


Here is a question that has nothing to do with pouring water with the watering can.  What happens when I put a funnel on the end of the spout and talk into the funnel? 

Several children asked the question: Does the long spout of the watering can fit though the hole in the bottom of the planter tray?  In answering that question, new questions need to be asked and answered.  Can I pour water into the spout from the exact same watering can with the narrow spout? 
Again, this is an intricate motor challenge in which the child is asking herself: Can I coordinate all my big and small muscle groups to pour water into a narrow opening from a narrow opening?

 
These two boys asked the question: How far up the hole can we push the spout?  In essence, they have plugged the hole making it possible to fill the planter tray with water.  This sets off a whole new chain of questions.  How high can we fill it?  What happens when it reaches the top of the spout?


The children actually fill the water in the planter tray to the level of the spout.  At this point, water starts to drain through the spout back into the watering can itself and then into the water table.  Leave it to the children, however, to keep asking questions.

In the video below, the two children see that the water is draining through the spout.  One of the boys starts to re-position the watering can so the tip of the spout is again under water.  Why does he do that?  One of the questions he seems to be asking is where does the water go?  He bends down to see the water coming out of the sides of the watering can underneath the tray.  A new question immediately forms about what is happening to the water in the tray.  He stands back up and looks right into the water in the tray again.  I ask: "What is happening."  Very quietly he answers: "It's falling down."  Both boys then look at the water and the spout as the level of the water in the tray reaches the level of the tip of the spout wondering what will happen next.  At this point, something quite amusing happens: as the end of the water drains into the spout there is a sucking sound.  Watch!


Watering can plug from Thomas Bedard on Vimeo.

One child laughs at the sound and the other child seems to be imitating the sound he hears from the spout.  The unexpected outcome continues to fuel there curiosity so they continue to create new questions and new ideas.

By featuring what children do with one simple object around the water table, the questions and thus, the ideas, are too numerous to name.  Now add in all the other objects, the setup and people the children are working with and there is an infinite trove of children expressing their ideas---and that is just at the sensory table, a throw-away corner in far too many classrooms.

Here is an inverse conjecture based on the first one earlier in the post.  Since children are continually asking questions, they are continually expressing their ideas in their actions to answer those questions.  This is a generative process that showcases their ideas in real time.  These ideas are fleeting and bifurcate in strange and wonderful ways that cannot be predicted.  If you value children expressing their ideas in many and varied ways, make room for their questions both verbal and non-verbal in every part of the classroom.

Saturday, September 3, 2016

Rocking chair waterfall

Last week I wrote about an apparatus I made from the arm pieces of a bentwood rocking chair.


The apparatus was suppose to be a water ramp, but it ended up to be rocking chair car ramp.

Because the wood of the rocking chair had so many nice curves to it, I was determined to make something from it for the water table.  I decided to try the curved piece at the bottom of the rocker with its nice, gentle curve.  The section of the rocker I cut is highlighted below.

I had a 12" x 36" piece of black HDPE 100 plastic left over from the car ramp apparatus.  Because the plastic sheet was bendable, I was able to screw it onto the two curved rocker pieces.

Parents in our program are always bringing in interesting things for me to build with.  Go figure.  A couple of years ago, a parent in our program brought in a really interesting piece: a deposit container for toner from a copy machine.  The picture below shows the schematic for where the deposit fits in the copier.

I decided that it was time to use it and that it just might be a good top piece for the new water apparatus.  I cut 2.5" holes with a hole saw attachment for the drill and then drilled multiple 1/4" holes in the bottom of the deposit.

Using duct tape, I then secured the deposit container to the the new water apparatus.

To install the new apparatus onto the table, I taped a white, wooden tray across the width of the table for a base.  To the tray, I taped a crate.  I could then affix the apparatus to the crate using duct tape.  I also taped the apparatus to the lip of the table near the bottom of the apparatus. 
In the picture above, one of the boys poured water into the top of the apparatus and the water came rushing out the bottom holes down the apparatus and into the black tub next to the table.

I had the hardest time figuring out what to call this new apparatus until I saw these two boys pour water simultaneously creating what looked like a waterfall.  Viola, a rocking chair waterfall.


Waterfall from Thomas Bedard on Vimeo.

Could you tell I was impressed?  I may build and set up the contraptions, but the children are the masters at giving them life.


Saturday, August 27, 2016

Rocking chair car ramp

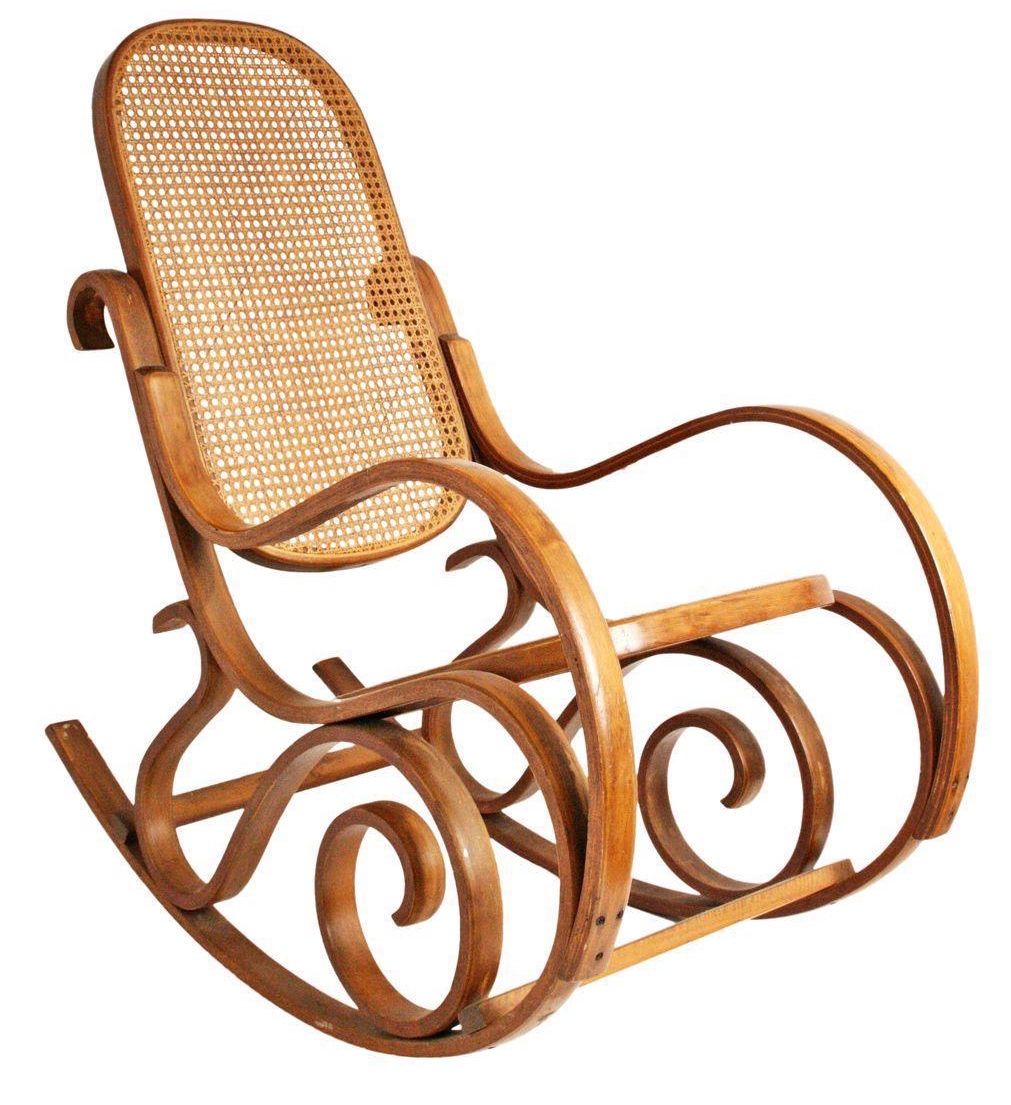
For a couple of years, pieces of a bentwood rocking chair had been sitting in my basement waiting to be repaired.  Here is a picture of a bentwood rocker.
I finally decided nobody was going to fix it so I was going to throw it out.  However, when I looked at the pieces of wood, I wondered if I could make anything out of the curved pieces of wood.  I was especially intrigued by the two handle pieces.
My initial idea was to make a curved ramp for the water table so when the children poured water down the ramp it would follow the curves of the apparatus and fly off the end.  I detached the two curved handle pieces.  I then used a utility knife to cut a black piece of 100 HDPE plastic so it measured 12" X 36." Because the plastic sheet was bendable, I was able to screw it onto the two curved handle pieces.
I left handles on one end so I could attach it to a base onto the water table.

When I got to school and tried it out, I was totally disappointed.  When I poured water down the ramp, the falling water never gained enough force to overcome the curve up to fly off the end of the ramp.  The water just pooled and rolled off the sides of the apparatus at the bottom of the curve.  I was all set to chalk it up as a failure and bring it home to try to modify it.

When I showed it to my colleague, she was impressed with the appearance and the form of the apparatus.  She suggested I put it somewhere else in the room for the children to explore using balls or cars.  I decided to set it up on the green steps in my room with a bucket of cars.  Instead of a rocking chair water ramp, I ended up with a rocking chair car ramp.

Here is what it looked like in action.  Three boys were camped around the ramp.  One of them was even sitting in between the handles in a comfortable position for launching his cars.   The child in the blue shirt launched a car that jumped right into the bin at the end of the ramp.  "Wow," he exclaimed. "It went right in."  As the car traveled down the ramp and launched, his right leg kicked in unison with the movement of the car.  He tried two more times, one time it crashed into another car, but that cleared the way for the third launch that flew over the bin.  At the end of the video, the child in between the handles launched two cars simultaneously, both of which flew off to the side on the end.


Rocking chair car ramp from Thomas Bedard on Vimeo.

Since the rocking chair car ramp was not tied down, the children could move it around to their hearts' content.  Two of the boys featured in the video above, climbed the stairs to sit on the window ledge so they could launch cars from a little higher elevation.
The arrow in the picture above points to the car that just flew off the ramp.  The higher the elevation, the more dramatic was the the flight for the cars.

Three children even turned the rocking chair ramp on its head.  They did that so they could see what would happen if they propelled the cars up the curved ramp.


Up the rocking chair car ramp from Thomas Bedard on Vimeo.

Silly me, I have no imagination.  I thought cars could only go one way on the ramp: down.

One child even turned the whole ramp over and ran her cars on the underside of the ramp.

Instead of using the ramp for propelling cars, one child used it for transporting the cars in mass.

 They also found out it worked well as a baby teeter-totter

Heck, it even worked well as a lounge chair.  It was made from a chair, after all.

I was about to take this home when I saw that it did not worked as I had intended.  I counted it as another one of those failed ideas for sensory table.  Thanks to my colleague who could see it with fresh eyes, I left it in the room as a loose part for the children to explore.  My intentions seem measly compared to the many and varied uses the children came up for this construction.

I am left with the question: How do we keep our "intentional" practice open to allow the children enough agency to discover the possibilities of a setup that can only be realized through their play?  Sometimes we need fresh eyes.  Thank you Lani for your fresh eyes.