About Me

My photo
Early childhood education has been my life for over 40 years. I have taught all age groups from infants to 5-year-olds. I was a director for five years in the 1980s, but I returned to the classroom 22 years ago. My passion is watching the ways children explore and discover their world. In the classroom, everything starts with the reciprocal relationships between adults and children and between the children themselves. With that in mind, I plan and set up activities. But that is just the beginning. What actually happens is a flow that includes my efforts to invite, respond and support children's interface with those activities and with others in the room. Oh yeh, and along the way, the children change the activities to suit their own inventiveness and creativity. Now the processes become reciprocal with the children doing the inviting, responding and supporting. Young children are the best learners and teachers. I am truly fortunate to be a part of their journey.

Saturday, January 26, 2013

TRAVELING PIPES AND TUBES

The last post was about the variety of ways children used Holes, Pipes, and Tubes in and around the Vertical Boxes with Horizontal Tubes.  The very last picture of the post showed two boys using pipes and tubes as firefighters to put out a fire at the sensory table.

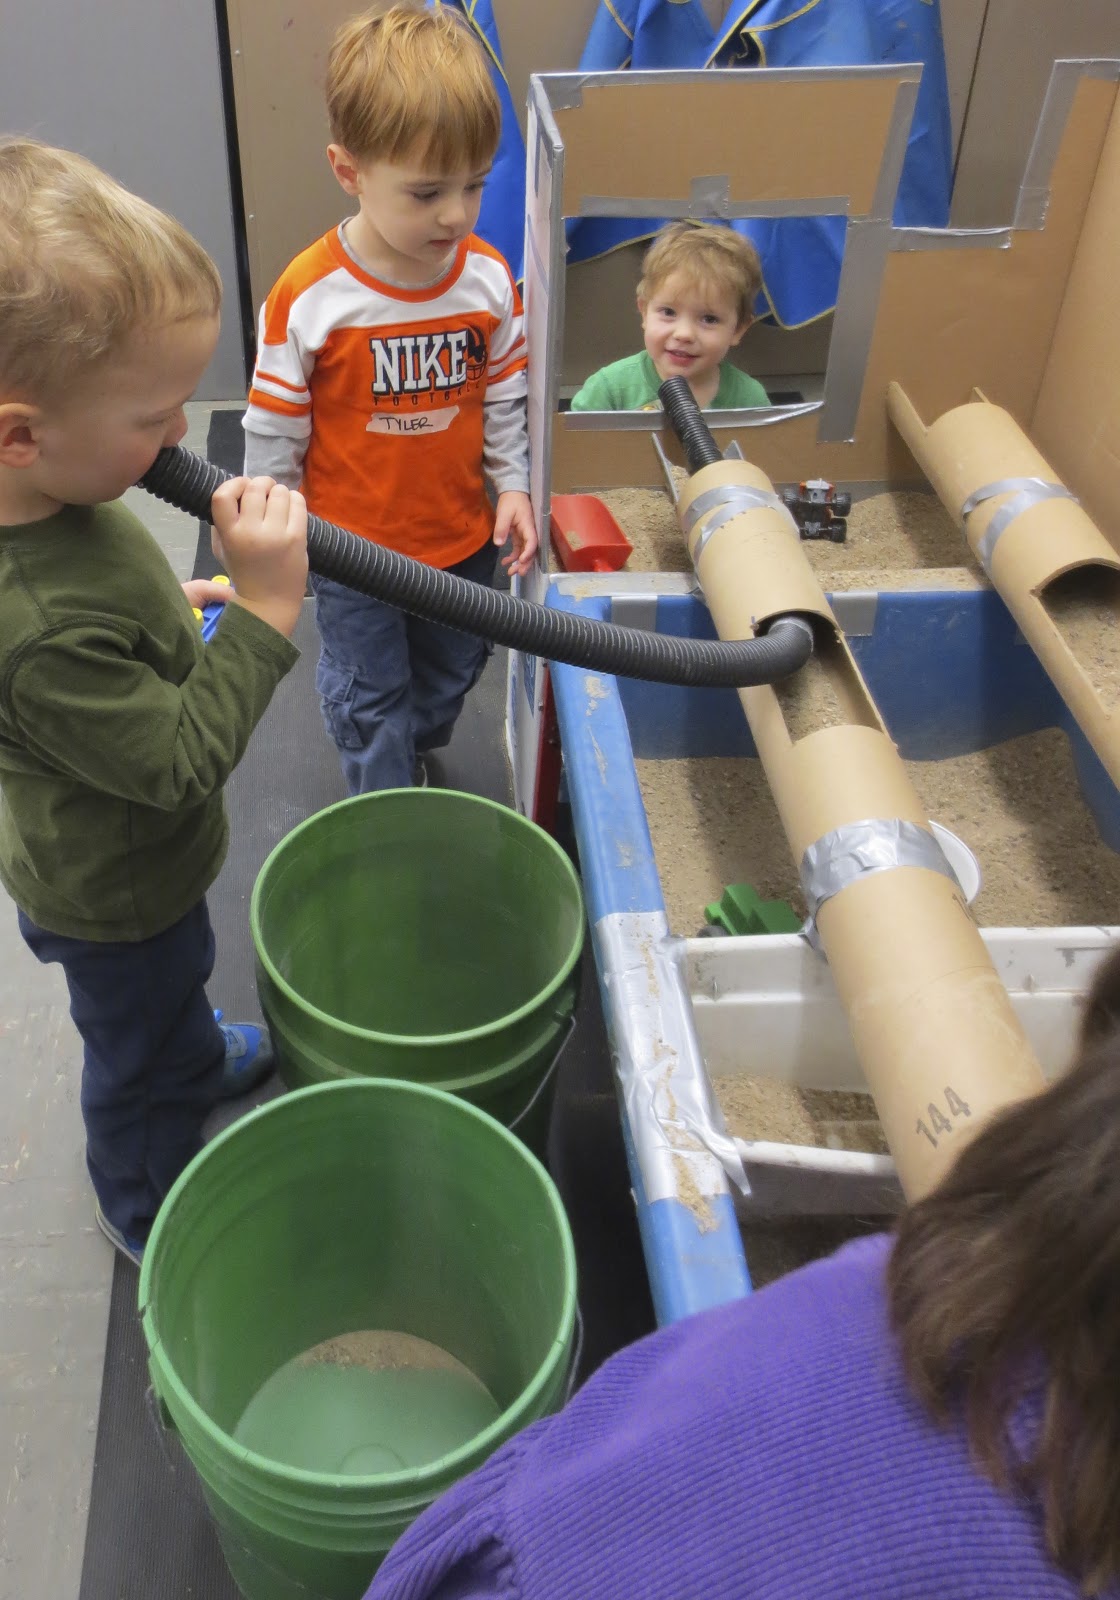
Now you might well imagine that if there was a fire at the sensory table, there must be a fires in other parts of the room. There surely were fires in other parts of the room, so the fire hoses---by necessity---had to travel to all other parts of the room, too  Thus we have the Traveling Pipes and Tubes.

Here is another example of how the pipes and tubes began to creep into the rest of the room.  In the video below, the child builds an arch by balancing the tube structure in the pail and on the floor.  After he passes under the arch, it tips over.  As he begins to build again, the structure is rearranged and takes a different orientation.


As the video ends, this little guy goes back to the table to look for more tubes.  He actually finds all pipes and tubes that are available on this particular day.  Look what he ends up with.


He has made a path of pipes and tubes that connects the sensory table with the block area. I am sure if there were even more pipes and tubes to work with, his structure would have traveled to more parts of the room.  It is amazing to me that he took such care to fit all the tubes and pipes together.  It was also amazing to me that other children respected his structure and would walk around it or over it.  

Here is another example of how pipes and tubes travel.  The boy in the video has inserted a smaller piece of pvc pipe into the larger flexible tube.  He uses the table as a platform so the tube can lie flat as he experiments with lifting the tube on each end to see what happens with the pvc pipe inside the tube.  He finally lifts the tube off the table so the pvc pipe drops through the length of the tube onto the floor.


So this child has taken a tube and a piece of pipe from the sensory area to an adjacent area to investigate how the pipe behaves in the tube.  At the end of the video clip, it seems that he acts with a clear idea of what he wants to accomplish.  Not bad for a young four-year-old. 

One of the tubes even made it to the opposite end of the room to the large muscle area. (By the way, I always have large muscle available in my classroom.)

This particular day, the climber and slide were set up in the large muscle area.  What could a child possibly do with the tube on the climber and the slide?

Well, she climbed up the slide with the tube in tow so that the tube lay on the incline of the slide.


What happened next?  As she sat at the top of the slide with the tube resting on the slide, I brought a ball over from the manipulative area and put it in the tube at the top.  She watched the ball travel down the tube and out the other end onto the slide.  

At this point, we created a little game between ourselves.  I situated myself at the bottom of the slide and rolled the ball up the slide for her to catch.

  After catching it, she would put it back in the tube for me to catch and roll it back up to her.

So often children will try to bring things into the sensory table area.  With the pipes and tubes, though, I found the opposite true: children brought the pipes and tubes to other parts of the room to suit their own purposes.  The results were astonishing.  Children were building in new ways; children were experimenting in new ways; and we created an endearing game of roll and catch.


Sunday, January 20, 2013

HOLES, PIPES, AND TUBES

Last week I wrote about an apparatus I call Vertical Boxes and Horizontal Tubes.

Instead of taking it apart after the first week---remember it took a bit longer to build---I left it up for a second week.  (I actually left it up for a third week, but I replaced the sand with corn to provide a different sensory experience.)  I did change the apparatus a bit, though.  I drilled holes in the boxes in various places and through the horizontal tubes.  And, I added loose parts in the form of pvc pipes, cardboard tubes, and plastic tubes.

Because the nature of the apparatus changed and loose parts were added, the nature of the children's exploration changed.  You get a glimpse of that change in the picture above in which the child is threading the pvc pipe through one of the holes in the box.

First, let's just look at some of the play fostered by holes. If we look at the picture above again, we can see the child investigating the hole with the pvc pipe.  Maybe it is like an explorer probing a hole with a tool?

In the video below, you can see how one child utilizes a hole for his own ends.  To set the stage, another child has poured corn on top of the box.  This child has decided he will get every last kernel through the hole.  The child is standing on a stool so he can reach the top of the box easily. Watch!

Sweeping the Corn in the Hole from Thomas Bedard on Vimeo.

At first he is able to use his hand to carefully sweep the kernels into the hole.  At some point, he decides that the best way to finish the job is to use his thumb and index finger in a pincher grip to get the final kernels through the hole.  There are two things to note.  First, that is a meticulous task for this two-year-old who has the patience to see it through.  Second, that pincher grip illustrates fine motor work that will serve him well when it is time to start writing.

Because we are a family program, we often have toddlers visit the pre-k room.  Even toddlers find the holes an irresistible draw to explore.

Second, let's look at what happens with the loose tubes and pipes.  Because of the variety of pipes and tubes that were provided, the children found many uses for those loose parts, most of which made sense in operational schemas that they created themselves.  Some of those schemas involve transporting and some of them involve other types of operations like connecting with each other, combining loose parts, and originating types of role play.

One child commandeered a large cardboard tube and set it up to transport sand from the box to the floor.  I really appreciated his ingenuity and told him so, but I suggested he put a pan at the end of the tube.
This is not as easy as it may appear because the tube is loose and moves when it is bumped.  He was pleased, though, that he could move the sand from the table down the tube.

Another child found a small, flexible tube that she used as a conduit to drop individual corn kernels into the tray in the table.  How much different could two types of transporting be?

The flexible tubes provided the opportunity for the children to weave the tubes through the holes.

And to place inside the cardboard tubes, which created the possibility to connect with a friend at a different spot at the table.

Another common action was to combine the various tubes.  In the photo below, the boy is inserting the stiff pvc pipe into a the black flexible tube.  

The sensory table is always a rich place for role play.  The two boys in the picture below decided to be firefighters.  They gathered the necessary accoutrements and used the pipe and tube to put out the fire.  

The apparatus provide unique and intriguing spaces for the children to physically explore.  More and more I am finding that the implements or loose parts also shape those explorations so the children create a myriad of operations that seems limitless.


Sunday, January 13, 2013

VERTICAL BOXES WITH HORIZONTAL TUBES

In the fall term, a colleague asked me if I wanted a large box.  The box was from an outdoor shed they had purchased.  I said yes.  The box probably sat on top of my cabinets for well over a month before I figured out what I wanted to do with it.  I played with many orientations before I settled on cutting the box in two and stationing each half on each end of the sand table.  I wanted to connect the two halves, so I installed cardboard tubes that spanned the table.  The result was Vertical Boxes with Horizontal Tubes.

This was a more involved project than usual because in cutting the box in half, I had to tape each of the new boxes back together to give them enough integrity.  In addition, I created false bottoms for each of the boxes so the surface inside the box would be high enough for the children to play on.  If the bottom was on the floor, it would be too low for the children to reach.

To create the false bottom, I found a box that filled the bottom of the bigger box enough to create a firm base for the false bottom.   It was important, though, that the base box be lower than the lip of the opening of the bigger box because I wanted to create space inside the box for holding sand.

Next, a flat piece of cardboard was cut to rest on top of the base box inside the larger box. That piece of cardboard had to be cut the width and depth of the box to form a false bottom.  After placing the piece of cardboard in the box, it was taped down with duct tape.  When that is done, the box was then taped to the table to make a seamless connection.  The false bottom is 5 inches below the lip of the box where it meets the lip of the the table.


The next step was to cut openings in the cardboard tubes.  In the past, I have used a utility knife, but that takes a lot of effort.  This time I used an electric sabre saw.  First, I made marks for the corners of the openings I wanted to cut out.  Next, I drilled a small hole on each mark so I could insert the blade of the sabre saw.  Finally, I cut out the openings with the sabre saw.   After cutting the first opening freehand, I decided to draw lines to connect the marks and define the openings more clearly to make the cutting easier.


I also cut notches at the end of each tube to make it easier for children to operate in the tube from the ends.   You can see why that is important when you see where the holes or "windows" are placed for this apparatus.


The next step was to place the tubes across the table.  Since the tubes were so long, I needed to create support in the middle so I used a planter tray that spanned the width of the table as a middle support.  The ends were supported by the lip of the table.  I duct taped the tubes at the support points.

The last step was to determine size and placement of holes or "windows."  There were two things I wanted.  The hole had to be high enough so a space was created inside the box to hold the sand in and not spill onto the floor.


Second, I wanted the hole to be big enough for children to easily reach through to do their work or to actually reach into with their body.


There are now two main focal points for the children to explore.  There are the windows of the boxes and the openings in the tubes.

This project took three times longer than usual to build for an apparatus made from cardboard boxes and tubes.  Was it worth it?  You would have to ask the children.


Saturday, January 5, 2013

HORIZONTAL CHANNELS COMPLEX

I have been asked many times: "How long do you keep an apparatus at the sensory table?"  My answer is usually: "A week."  That is the answer I give because my creative outlet is to build apparatus for the sensory table---and we all need a creative outlet.  I do have this urge to build, so even if I keep an apparatus for longer than I week, I tend to add onto it. The Horizontal Channels is a good case in point.  The second week, I added a Dome.  The third week, I added a vertical box with lots of holes and a cardboard tube.

The result is a Horizontal Channel Complex.  Fortunately, the IMac box is the same width as the box on the floor so it could be taped to two of the corner edges of the floor box. The result is more vertical stability.   

To make the new vertical box with holes even more secure, it is tied directly into the ramp with duct tape. In addition, the cardboard tube is taped to the box and the channel crossbar to give the box lateral stability.

One final note about the construction of this new addition.  Half of the bottom of the vertical box is left intact so the box retains its integrity.  There is an added bonus, too, because when children pour corn through one of the holes and it hits the bottom of the vertical box, their action takes on an aural dimension.

In this post, let's look at just one feature of this new addition, namely the holes.  Before doing that, you may want to look at Element #5 and Axiom #5 in the right-hand column of the blog.   Those two suppositions speak to a child's need to engage with holes.

Without the vertical box with the holes, a child has a clear view of the ramp which allows her to scoop and pour directly onto the ramp.

With the vertical box in place, that operation looks totally different.  First, the child only has a limited view of the ramp through the hole.  The child now becomes an observer watching the corn slide down the ramp through a "window."  

Of course, a child is not content to simply watch.  She must explore and interact with the apparatus and what better way than to use the holes.

Not only is she interacting through the holes, but holes offer a perspective on the action that is unique.   That is true when watching another's action through the holes or watching your own actions through the holes.  In the picture below, notice how the child is pouring corn in the top hole while watching it drop into the box through the hole directly below that top hole.

Even if you cannot see the action through the holes, you can certainly use them for your own purposes. In the picture below, the child is passing his truck from one hand to the other.  
His right hand is passing the truck to his left hand.  To do that, his right hand reaches under the vertical box to meet his left hand which he stretches through the hole connected to the ramp. You might not be able to see it, but he is really stretching to make the exchange.  His head and torso are pressed up against the box.  He can't really see the exchange, but he can feel it.  It is amazing to think of the proprioception and cognitive mapping that must be developing as this child completes his self-selected task.

Holes are important for children.  For some reason holes are elemental in how the children relate to the physical world and, in this particular case, how they interface with this apparatus.  

And that's the whole story for today :-)


Saturday, December 29, 2012

DOME EXPLORATION

Last week I explained my thinking for putting a Dome over the Horizontal Channel apparatus.

I know it is not really a dome; a dome is rounded on top.  It is a box with holes, but that does not do it justice.   It does not do it justice because the play it elicits from the children is exquisite, like the shape of a dome.  That is enough poetic license for now.  Sorry.

The truth is that the box over the horizontal channels changed the nature of play because it added intriguing spaces for exploration.  For children the equation works something like this: more intriguing spaces equals more exploration.

Let's look at some spaces the children discovered to explore and what those explorations looked like.

First, there are the openings created by the box over the channels.  In the picture below, the boy keeps running the palm of his hand under the edge of the box over and over again.  Why?  To see what it feels like, of course.

From feeling the edge of the box, this child starts to feel the corn by reaching under the the partition.  His hand is totally immersed in the corn.  Immersing his hand under the partition has to be a different sensation that simply immersing his hand in an open channel.  The feeling of immersing in this instance is totally cut off from his vision by the partition.  As you can see, this two-year-old finds this part of the box appealing and worthy of exploration.

Second, there are the windows.  One scenario is to work outside the window to get something through the window.  The child in pink is using a little plastic tube to transfer corn from her cup outside the window to the area inside the box.

A second scenario is to use the window to work inside the box.  The girl below is filling her truck with the corn.  To do that, her entire head, arms, and torso are in the box.

A third scenario is to use the window to work inside the box to get the corn out of the box through the vertical chute.  Watch as the boys below work at getting the corn down the chute.


Fourth, there is the bottom of the vertical chute.  If you drop the corn down the chute, you necessarily find where the corn ends up after being shepherded down the chute.

Firth, there is the top of the box.  Not only will the children play with the objects and material on the top, but they will use it to gain another perspective on what lies beneath.

 And sometimes there is a surprise: a friend looking back at you from inside the box.

And how about this: The girl below is trying to retrieve her bulldozer that dropped down the hole. She is reaching through the very same hole on the top of the box.  To do that, she is actually lying on top of the box.

I have always been amazed at how children explore spaces.  I enjoy documenting the how.  Why children explore spaces the way they do is often a mystery that eludes me.  That mystery keeps me intensely curious and spurs me to create new, intriguing spaces for them to explore in novel ways.


Thursday, December 20, 2012

HORIZONTAL CHANNELS WITH A DOME

Last week I wrote about the most recent version of a Horizontal Channels apparatus.  I left the channels up for a second week, but added a dome.  Well it is not exactly a dome.  It is a box over part of the channel apparatus, but I am taking a little poetic license.


I want to use this post to give you an idea of my thought processes in adding the dome.  First of all, when I made the Horizontal Channels, I did not measure correctly the width of apparatus, so instead of covering the whole table, I was left with a little ledge on each side of the table.

There was also a larger area in the back of the apparatus that was left uncovered because in setting up the ramp, the apparatus had to be pulled six inches further down the table leaving a bare space on the end opposite the ramp.

Those measuring mistakes gnawed at my brain.  I began to wonder if I could extend the channels. I could have added a separate channel on the back perpendicular to the others.  As I thought about it more, though, I realized the ledges could offer strong support for a box placed over the channels.   The question was: Do I cover all or some of the channels?  I decided I only wanted to cover part of the channels because I wanted to keep a certain amount of the lateral play that this apparatus seems to fostered.

The next question was: Can I find a big enough box to span the channels and cover the back ledge, but not the whole table?   My question was answered the next morning---literally.  When I came into work, I saw a very nice box that looked like the right size sitting in the front hallway of the school.  I asked the custodian why was there a box in the front hallway.  He told me he had set it aside for me.  The custodian really had no idea I was looking for a box with just the right dimensions for the dome.  He is in my room every day, though, so he knows I appreciate a sturdy box.  How is that for luck?

Once I had the box, a decision had to be made about where to position it over the channels. There was one overriding factor that determined the placement of the box.  I wanted to attach a vertical chute that would empty into a tub off the end of the table.  That meant the box had to stick out far enough over the table to accommodate the vertical chute and the tub into which it emptied .

Below is a picture of the vertical chute seen from the inside of the box.
(By the way, the vertical chute was another offering from a coworker earlier in the month.  I had been saving it for just the right apparatus ;-)

Once the position of the box was established, I had to decide on the placement and size of the holes.  The holes on three sides were easy.  I wanted the holes to be big enough so the children could reach inside, not just with their hands, but also with their body.  I also wanted the holes to act like windows so children could interact through them.

The hole on the top of the box was also an easy decision.  I knew I needed one on top because children will work on all levels of any apparatus (Axiom # 3 on the right-hand column of the blog). Without a hole, corn would collect on top and then be brushed off onto the floor.  Providing a hole on the top created an outlet for the need to work with corn on the highest level. In the picture below, the child is watching his own action of pouring corn through the hole on top.

But I did not want the top hole to be too big because the top itself offers another valuable space for children's play.

The hardest decision for me was the shape of the holes in front.  I could have done one big hole like I did with the other three sides, but for stability I wanted some of the holes resting on the channels.  I decided to cut a big hole over the large channel.  I decided to cut the holes over the narrow channels the height of the channels themselves.  That gave the dome stability and also created obstacles for moving the corn or vehicles through the narrow channels under the dome.

So there you have it.  First, there was a mistake in measuring the original apparatus so it did not completely cover the table.  Second, there was the mulling over ideas for covering the exposed space which led to the idea of placing a box over the exposed space and part of the apparatus itself.  Third, there was the custodian setting aside and offering me just the right box without knowing I needed it.  Fourth, there was the decision to add a vertical chute to the dome which in turn determined where to place the dome over the table and apparatus.  Fifth, there were multiple decisions made about the size and placement of holes.  Viola!  The Horizontal Channels with a Dome was born.

As you can see, there was some intentionality in building this apparatus.  You should also see that there is a fair amount of serendipity.  Often times, I may have a general idea of what I want to build, but in the building of the apparatus, things necessarily change.  The idea only takes final form in the act of building.  If I find myself trying to figure out every detail before I start to build, I become paralyzed and unable to start a project.  It takes a certain amount of momentum to finish any project so this is my mantra: the only way to get momentum is to start.