About Me

My photo
Early childhood education has been my life for over 40 years. I have taught all age groups from infants to 5-year-olds. I was a director for five years in the 1980s, but I returned to the classroom 22 years ago. My passion is watching the ways children explore and discover their world. In the classroom, everything starts with the reciprocal relationships between adults and children and between the children themselves. With that in mind, I plan and set up activities. But that is just the beginning. What actually happens is a flow that includes my efforts to invite, respond and support children's interface with those activities and with others in the room. Oh yeh, and along the way, the children change the activities to suit their own inventiveness and creativity. Now the processes become reciprocal with the children doing the inviting, responding and supporting. Young children are the best learners and teachers. I am truly fortunate to be a part of their journey.

Wednesday, January 26, 2011

CARDBOARD CHUTES-CLOSED-EXPERIMENTATION

Experimentation with closed chutes in some ways looks like the experimentation with open chutes.  For that description look at the post from December 2nd here.  

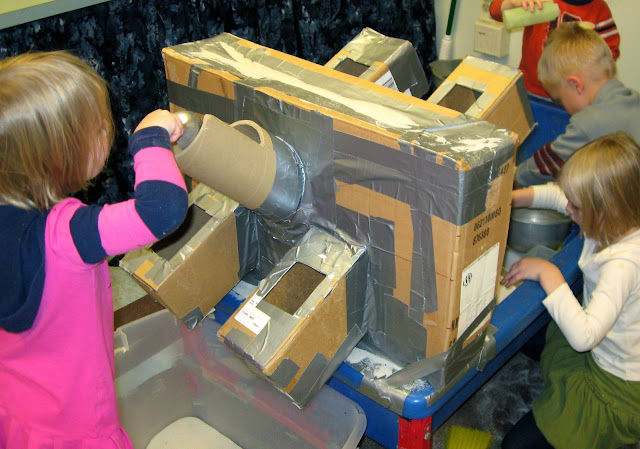
Experimentation, discovery, and play take different forms, though, with the closed design.  That is because there are more defined spaces.  With the open chute, it is more like one continuum, whereas the closed chutes have several intersecting planes that crisply demarcate spaces.  Look at the apparatus below.


First, there is top of the chute.

And then there is the bottom of the chute.

Both spaces are well defined because the support box divides the chute into a top and bottom.  What is interesting is that the child catching at the bottom does not see when the person on the top is pouring so he has to rely on his aural sense to know when something is coming down the chute.  Of course, a child could hedge her bets by covering both chutes.  That way, whichever chute the other child decides to pour into, she has it covered.

There is also the tube in this particular apparatus which has two different levels: the top which is over the tub and the bottom which reaches into the table.


If you notice in the picture above, the child is actually pouring sand into an opening that has been cut in the tube.  As she pours, two things happen.  The first is that the sand slides only a short distance and the second is that it mixes with the sand being poured from the top of the tube.  What must she be thinking and feeling when she watches the sand she pours only slide a few inches and then get swept away with the sand from the top?

There is another space that offers children another level on which to operate.  That is the top of the divider box.  It is a place to find stray pellets to sweep with your hand or....

a place to stack all the pellets you can collect in whatever container you can find.

For some children this apparatus provides an opportunity to simply pour into holes.

For others, it offers opportunities to observe what happens as one works with the different materials and objects provided with the apparatus.
This child decided to put a funnel in the hole on the top of one of the chutes.  He pours sand, which is quite fine, into the funnel and then looks down the tube to see the result.

This is the children's table to experiment as they see fit.  Observing the children has taught me to expect the unexpected and appreciate their inventiveness.

Thursday, January 20, 2011

CARDBOARD CHUTES - 2 - CLOSED VERSION

If you look at the DIMENSIONS in the right column of this blog, the first CARDBOARD CHUTES posted in this blog (November 26th posting) fell under the dimensions of open and incline.  The cardboard chutes in this post are also incline, but closed.  Since this actually takes some putting together, this post talks about building the apparatus.  The next post will talk about types of play and exploration fostered by this apparatus.


For this apparatus, I used three boxes.  The first box---the support box---was approximately the width of the table on one side.  It was also both narrow and tall on its other two sides.  Since it was the width of the table and fit snugly inside the table, it was easy to tape it securely into the table.  The narrowness made it possible for the chutes to pass through it.  The height allowed the chutes to be set on an incline.  Two other boxes were used for the chutes.   One of the chutes in the picture above is a box that held window blinds and the second chute is a box that held an artificial Christmas tree.  I cut out both ends of the box.  Without those ends, the chutes collapse easily.   When they are embedded in the support box, though, they are quite stable.

Here are three boxes I used to make closed chutes three years ago.


Here is the apparatus:

In this version, the support box is as wide as the table and actually sits on top of edge of the table.  A cardboard tube has been added so the flow of material can go two ways.  With the chutes only going one direction, the play and exploration sometimes stopped when most of the material was emptied from the table.  Because of that, I considered the first design flawed and made the modification while the apparatus was still attached to the table.


To make the holes for the chutes, I first trace an end of the "chute" box onto the support box near what will be the top.


If I were just to cut the shape I traced, the chute would be horizontal when I insert it through the box.  


I don't want that, so I add an inch or two to the original trace on the top to be able to orient the chute on a slant.


Two inches is a lot to add to the original trace.  The more you add, the steeper the slant. (This almost sounds like a geometry lesson for a teacher.) 

By the way, I hardly ever measure.  Once I have done one side, I move to the other side.  I trace the chute on the other side; I usually place the top of the trace on the second side about where the bottom of the trace is on the first side.  I then add an inch or two to the bottom.


When the holes are cut, I insert the chutes through both holes.


After inserting the chutes, I tape all around the them with duct tape to keep them from sliding up or down in the support box.  If I have cut the hole a little too big for the chute, the taping covers up extra spaces.  Taping is another process for which I do not measure.  I like to use duct tape that tears easily.  I will tear off a piece that is longer than the juncture I want to tape.  I use my fingers to push it into place.


Once the tape is in place, I tear or cut any extra that is hanging past the corner.  One section of the torn duct tape is pressed flat against the box, whereas the other is folded over and down.  


When I have taped all the chutes in place, I tape the apparatus to the table.  I orient it so the higher end of the chute is above the table and the lower end extends over the table and directs the material into a tub on the floor next to the table.

OK, kids, it is now yours to explore!


If you are counting, there are eight children around this table playing on several different levels afforded by the apparatus.


Thursday, January 13, 2011

A REVISIT TO THE DIVIDERS: FLOW OF PLAY

Here is an attempt to show the flow of play in and around the dividers.

Note that there are no limits on the number of children at the table; they do a nice job of limiting themselves and negotiating spaces.


For the dividers, the initial rush usually finds children working in their own little spaces.  Before long, though, children start interacting between the spaces, sometimes oblivious to who is in the other space, but often times creating some type of social interaction/game.  This happens quite naturally without any prompting.


Children drift off to other activities in the room.  Some children who have not had a chance, or do not like crowds, take their turn at the sensory table.  Sometimes that play is solitary.


After checking out other activities room, some children come back and take play in a different direction, often on a more complex level.


Here, Charlie has come back to the table.  He has given himself the task of putting all the pellets in one of the square foot sections of the divided table.  Notice he has already emptied the adjoining section and has moved over to the end space on the same side.  He now transports the pellets from one end of the table to the other.  Miles joins him.  Miles does not use words to join Charlie's play.  Instead he uses non-verbals to insert himself into the play.  Charlie accepts his overtures and now turns the play into more than just filling the space with pellets; it also becomes burying Miles' hands.

David is in another part of the room by himself.  No one is at the table at this point, so I invite him over to see the pellets and the divider.  See his play in a previous post here.  

Next comes Maggie.  She watched David pour through the window.  Now it is her turn.  She does it a little bit differently.  She scoops pellets into a juice container, puts it through the same window, and then dumps it out.

Minutes later, David is back operating in the space where Charlie has amassed the pellets.


David pours the pellets into the pail next to the table.  I say: "I heard that."  He smiles and does it again. Maggie hears David pour the pellets into the bucket.  To her, though, it sounds like David has poured them onto the floor.  She cannot see David because she is on the other side of the divider.  She pours pellets onto the floor and looks to me for validation.  She is expecting me to say the same thing I said to David.  She was surprised when I told her not to pour the pellets on the floor. I explained that David was pouring into the bucket and not onto the floor.  She scooped up some pellets, walked around the divider and poured some pellets into the same bucket.  Now I could tell her: " I heard that."   She was validated and quite happy with herself.  This also moved her to the other side of the table.

Charlie hears the pellets falling in the pail and comes over and says: "Oh, we're moving it into the bucket, now!"


Charlie pours pellets into the bucket and Miles follows suit.  Charlie tries to find a place to scoop pellets.  He gently inserts himself between Maggie and Miles.  Miles wants to get some more pellets so he gives Charlie a little hip.  Charlie says "Hey!" and Miles responds with a "Hey" back. They work it out so both are scooping and dumping pellets.  In the meantime, Maggie is scooping pellets from the same small space and David is reaching into that space through the window getting his hand caught in the window.  He then comes around to check out where his hand got stuck.  

What is striking and amazing is that the children went from individual play in each space, to social interaction between the dividers, to more individual play---some of which shows elements of awareness of the other's play---to four children all operating in a small section of the table no larger than one square foot.  The flow of this play took place in the course of about 40 minutes.  

Set up an apparatus, let them go, offer a few prompts, and the natural flow of play is a wonder to behold.


Wednesday, January 5, 2011

REVISITING CARDBOARD CHUTES---PURE JOY

When I was looking over pictures and videos for a new post, I ran across a video that I could have used in the post entitled: CARDBOARD CHUTES - EXPERIMENTING.  The small video exemplifies how joyful learning can be.  Isaac is experimenting by rolling different objects down a chute.  He experiences how gravity influences objects on an incline plane.  Of course, he is not thinking that, but he is physically experiencing it (touch, sight, and sound).


Now that was fun!

Wednesday, December 29, 2010

COMBINING APPARATUS: CARDBOARD DIVIDER AND TUBES

Combining apparatus allows one to exponentially vary the configuration of any given apparatus.  That is especially true if you keep in mind all the dimensions mentioned in the right column of this blog.  Here you see a cardboard tube embedded in a cardboard divider.


Note that this is another version of the cardboard dividers(see previous post) in which the panels are low.

A hole is cut in two of the panels on one side. The cardboard tube is threaded through the holes and taped.  A section of the tube in the middle has been cut away.   Now besides the open spaces created by the vertical walls of the divider, the tube creates both horizontal and closed dimensions to the apparatus.


In another version of this combined apparatus, an additional plastic florescent light cover is embedded in the divider.  This configuration is a little different because the table is used to support one end of the tube and channel and both the tube and channel extend over the end of the table so children can push the sand out of the tube and channel into the tub below.


Little construction vehicles are added because they fit nicely into the tube and channel and create a different type of play with moving the sand with front loaders and bulldozers.  

If you look at dimensions to the right again, the cardboard divider is an open apparatus with vertical walls.  The tube in the apparatus introduces a horizontal and closed dimension and the plastic channel adds an horizontal and open dimension.

What does that mean for play?

It offers opportunities for focused play in an individual space on a different level with a different dimension.  The child below is playing with the truck and bulldozer on a level six inches above the bottom of the table.  Now he can play on two levels in the same space.  In addition, he is operating on a  horizontal open plane.  That naturally restricts his motor movements on that plane.
The child below is scooping sand with her hand from the tube.  This is a horizontal plane that adds a closed dimension to the apparatus.  How far can she move her hand when she scoops the sand?  And how far into the tube can she reach to scoop the sand?  She, too, can operate on two different physical levels. Actually, there is a third level with the tube when you see the tube as two separate levels: in the tube and on the tube. Both the channel and the tube offer motor experiences on a horizontal plane.  The tube also offers motor experiences that are altered by the open/closed nature of the tube.

If also offers new challenges for transporting the sand both through the window and through the tube.


It also offers new opportunities for social interaction.


And it offers new opportunities for role play.

Children will explore all the spaces you give them.  Their exploration lays the groundwork for knowledge of spatial relations.  It almost sounds like math!

Tuesday, December 14, 2010

CARDBOARD DIVIDER AND UNIQUE TYPES OF PLAY

The cardboard divider facilitates some types of play that other apparatus in the sensory table do not.  For instance, transporting takes on a whole new dimension with the divider.  Look at the picture below.


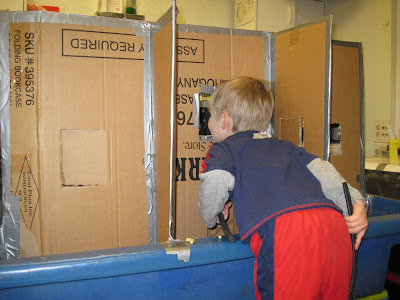
A child is transporting through the window into the opposite space.  To do that, he has do several operations.  First he has to scoop.  Without trying to spill, he has to lift the spoon and open the window.  He then has to stick the spoon through the window and then turn his wrist to dump.  The divider has added more layers of complexity to transporting.  What is interesting about this operation is that the child does not see where the material is going.  It is blind transporting where something just disappears.  That in itself is inviting for the child.  This is a good illustration of AXIOM 5 of sensorimotor play seen on the right column.
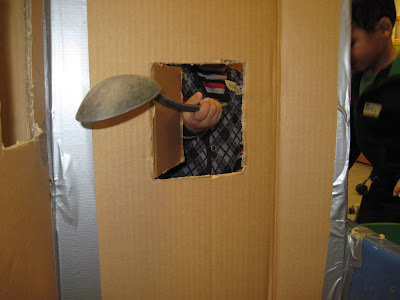
Here is another example with a little twist.

Note that this divider is a little different than the others pictured so far. When I built this one, I did not have a box with large enough panels to completely divide the areas.  In this picture, one panel is lower. That is not an issue for children.  They will still come up with their own challenges.  The boy in the green is pouring through the hole, but in this case, he is actually reaching over into the middle space on the opposite side where you see the girl in the scarf.  He has skipped a space in his work.  That is probably his attempt at making the work a little more challenging by seeing how far he can stretch(a good example of trunk extension).


This transporting takes on yet another dimension when a child watches where the material goes.


Here the child is actually watching himself pour the sand through the hole.  He has given himself a target (the pail) into which to pour the sand. Now think about the hand-to-eye coordination task this child has set up for himself.  He is pouring the sand through the hole watching from around the divider.  The divider cuts off the visual connection between his arm and his hand.  He is forced to complete his task by filling in or constructing the pouring motion without a complete visual connection between what he is doing and the result.


Here is another example.


The child in this picture does not have a target, but what is striking is that his action is connected even through the divider. He is pouring from one side and on the other side he is using his other hand to help finish the action. He can only watch on one side and he chooses the side where the action is being completed. Though there is a divider, his body action is all connected.  Children often do operations like these at a divider between spaces.  Very interesting, no?


Take a look at this video for yet another variation of the transporting that takes place with this apparatus.

David opens the window, puts the cup through the window and hangs a measuring cup by its handle on the window.  (This hanging of the measuring cup was first introduced to me by a child several years ago and now I use it as a prompt for play.) He takes a scoop of pellets, reaches through the window and pours it into the cup. He opens the window, lifts the cup and pulls it back through the window. He brings the cup around the divider and dumps it in the opposite space.  He finishes by showing me his empty cup---maybe proof of all the work he has done?  So why would a child go through all the operations to move the pellets into the opposite space when he could have just opened the window and dumped the pellets into that space? It's all about transporting and the need to transport and find as many ways to do it as possible.  And in the meantime, he is working on eye-to-hand coordination and other small and large motor developmental tasks.

There is another type of unique play that occurs with the dividers that needs to be highlighted.  That is peek-a-boo.
It happens every time the cardboard divider comes out and is a source for lovely social interchanges.  That is especially true when the child on the other side is not a usual playmate.

Thursday, December 9, 2010

CARDBOARD DIVIDERS

One day several years ago, I was watching children play in the sensory table.  On this particular day, I couldn't help but notice how one child's play impinged on another's.  My question became: Is it possible to make smaller, divided areas in the table?  The answer: cardboard dividers.


This was the first cardboard divider I made.  It is in an old sand table I inherited when I took over a new classroom.  It is a metal square and less than a foot off the ground.  (I actually liked it because it was simple and allowed me to build and add my contraptions to the table.  There was only one problem: it would not hold water.  If I wanted water in a table, I had to have a second table.  My room was small, so I ended up getting one table that would hold both sand and water.


The cardboard divider is very easy to make.  Take two flat pieces of cardboard.  Cut the pieces so they fit into the table.  Next,  make slits in the middle of each piece approximately equal in length.  One piece is slit from what will be the top and the other is slit from the bottom.  They are then slipped together at the slits.  Tape the joint that is made by the intersection of the two pieces of cardboard and then tape it in the table.


Since my current sensory table is larger, I added an extra panel of cardboard to create six smaller spaces.


These spaces can facilitate some focused individual play.


Or provide another space into which a child can transport or collect objects.


Though I wanted to create individual spaces, I also wanted to allow for social interaction.  The solution for that was to cut various holes in the walls.  Some are outright holes and some act like windows that can be open and shut.  Here are four children, each in their own space.  The child in the top right is pouring pellets through the window into the cup of the child in the bottom right. He is observing the action and waiting for the cup to be filled by the hand coming through the window.  The boy in the top center is pouring his pellets into the space directly opposite, while the girl in that space is pouring pellets into the lower right space.


The running joke in the room is that this apparatus is preparing the children for the world of work with each of them toiling away in their own little cubicles.  You be the judge.