Thursday, March 31, 2011

HORIZONTAL CHANNELS

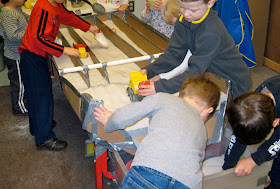
A few years ago, our site ordered a new easel.  Though it was nice to get a new easel, I wanted the box.  It was a large flat box.  The question immediately became: What apparatus lies within a box with these dimensions?


I wanted to make something that would take advantage of the flatness of the box.  I decided to make something that would fit on top of the sand table.  When I say on top, I mean on top of the cover of the sand table.  That way the top of the table could give a flat-structured apparatus more strength by serving as the support for the apparatus.


I settled on a channel apparatus.  I always think in terms of dimensions;  the flat, openess of the apparatus with individual channels offered new and unique dimensions for the children to explore.


If you are looking at it in terms of dimensions, then, you will see the apparatus is very open and has a horizontal orientation. Separate spaces are created by the little cardboard barriers that form the channels.  They are long, narrow spaces that are relatively shallow.  Since there is a ramp for the sand to slide down, there is an additional level represented by the bottom of the tub.  If you take the ramp separately, it is really a continuum of levels.

Just a quick structural note: The sand is quite heavy and without the support of the table's top underneath, the apparatus would sag and loose structural integrity.

The easiest way to make channels is to find a box that already has the dimensions of a channel.
You can see this type of box all the time in the big-box hardware stores.

Cut the top with a utility knife or a box cutter.

Place it in the large, open box and tape in place.  I like to keep the end I will be taping to the box intact to give the channel extra strength.


If you don't have a box that has the dimensions of a chute, you can still make one easily.  Look for a box that is long and narrow.  Measure how long you want the channel and then how high you want the sides of the channel.  When you have made your marks cut the box using a utility knife or a box cutter.

To stabilize the channels on the open end, I tape a pvc pipe across the end.

Without the pipe, the channels tend to lean.  I have done that before and it does change the space in which the children operate.  They can, however, learn that lots of sand can constrict the channels.

The ramp is the most difficult for me to make.  I usually tape another open box to the apparatus.

When I do that, I add a triangular cardboard piece on each side to get the slant for the ramp.  It is hard to see in this picture because it is completely covered with duct tape, but you can kind of see it in the middle, right?

You could use the apparatus without the ramp and still see unique play on the part of the children.

The ramp, however, has a way of expanding play onto different levels on a continuum bridging the top of the table with the bottom of the tub.

Wednesday, March 23, 2011

VERTICAL TUBES IN A BOX - OTHER NOTES

There are a couple of additional notes to go along with this apparatus.  1) If you change the material in the table, you change the activity; 2) There are spaces created by the apparatus that are not part of the apparatus.

This apparatus was set up for two weeks.  The first week the table contained fine, white sand and the second week it contained fuel pellets.  Fuel pellets changed the type of play in the table.  The children could no longer use funnels like they did with the sand, but they could do other things.  One thing the fuel pellets encouraged was more role play, such as cooking.  One of the other discovered activities was plugging the tubes at the bottom.


One boy figured out that one of the measuring cups fit nicely into the bottom of the plastic tube.


Yep, it's plugged.


Now it is time to fill.  It is easier to fill with pellets than with sand because the weight of pellets is so much less. There is an added sensory bonus: pouring pellets does not sound or smell like pouring sand.

Because I observed this child plugging the tube, I was able to use this same provocation with children in other classes.  In one of the classes while a child's parents were in the room, I plugged  the tube right before the child poured the pellets into the tube. I asked the child "Where did the pellets go?"  She had observed before that they emptied through the tube into the table, but now she couldn't figure out where the pellets went.   She poured a second time and looked for the pellets emptying into the table. In the meantime, her parents picked up the questioning.   The father said he could see the wheels turning in his daughter's head trying to figure out where the pellets were going.  The child figured it out in short order without help.  The parents and their child then took the activity to another level.  They decided to see if they could plug all the tubes and fill them all up.  That interaction between the parents and their child was an extra validation for this activity on this particular day.


One of the added advantages to building an apparatus for the sensory table is that the apparatus creates spaces to play and explore that are extraneous to the apparatus itself.  For example, here are two children who are playing at the table but not with the apparatus.


One child is busy carefully filling a measuring cup while the other child is emptying it.  (It is a curious interaction because they appear to working at opposites harmoniously.)  They are both operating next to the apparatus, but not using it at all. You may think that this play could happen even without the apparatus. Yes it could have, but the apparatus is still creating another space in the table that is not part of the apparatus.  Just look at the vertical plane of the box next to the two children.  It is not an enclosure, but it is still an area created by being "next to" the apparatus.

Here is another example.


Oscar is operating on the end of the table where the apparatus does not extend.  He is making soup---green soup to be exact.  He is making it to pour it out.  Again, this play could have happened without the apparatus, but the space created next to the apparatus enhances his focus.

I have known for many years that just changing the material in the sand table changes the play and exploration. I am now beginning to realize that an apparatus creates spaces extraneous to the apparatus itself.  Children will find those spaces and use them in their play and exploration.  In fact, they are so good at it they will find spaces that I had no idea existed.

Thursday, March 17, 2011

VERTICAL TUBES IN A BOX - MORE EXPLORATION

If you look at last week's post you will see two boys making accommodations so both can play in the same space.  They were not cooperating, but each allowed the other to play in the exact same space.  There is a certain beauty in that coexistence that we far too often overlook.

In this post, let me give you a few examples of more cooperative play fostered by this apparatus.
In the video below, one boy is pouring sand into the top of the tube through a small plastic base that has a small hole on the bottom so it acts like a funnel.  At the bottom of the tube, another child is arranging a sauce pan and scoops so the sand flows just right into the sauce pan.  I was asking Gabriel to clarify where the sand was going and he said: "Owen is collecting it down there."  In the meantime, Owen is saying that he "...can't get it to go right."  He removes one of the scoops and says: "There we go.  That's good."

(Just a quick note about YouTube videos.  I have trouble uploading videos longer than 15 seconds directly to Blogspot, so I upload longer clips to YouTube and then embed them in the blog.  The quality is better, but with any YouTube video, there are suggestions for related videos.  The suggestions for related videos do not have anything to do with this blog.  Please be aware of that if you decide to browse the suggested YouTube videos.)


In this video each child's action is an extension of the other's.  One is pouring and the other is collecting---and they acknowledge it verbally.   

Here is a another video in which the children are working together.


These boys are making a concoction.  Each is adding an ingredient.  One child has taken the lead and the others are following and even echoing the named ingredients. This is rich role play which often gets more and more imaginative.  Near the end, they are adding lobster heads and medicine. Role play by its very nature requires cooperation.  They take turns pouring and naming what they are putting into the concoction.  Take turns is used loosely, because there is no order and at times they are all pouring  almost simultaneously.  As the activity progresses, you can also notice how the excitement of one feeds off of the excitement of the other.

Another play that takes cooperation is one in which the children give themselves a task.  In this next video, some of the children at the table have decided they want to fill up one of the tubes.  That is no easy task because the tube empties into a tray. Watch.

Three boys have indeed filled up the tube, but then the sand drops as if it was a sink hole.  It takes only a short time before one of the boys figures out why the sand level drops: another child is scooping the sand from the tray underneath causing the sand to drop in the tube. The drop seems to nudge them to refocus their efforts to fill up the tube again.  This cooperative play is a little different than role play because the task is a physical task for which the completion has more to do with the properties of the sand, tube and tray than on their imaginations.  

What is amazing even in these videos of cooperation, you can see individual play right along side the cooperative play.  For instance, if you look at the last video again, you will see four other children operating with no conflict in much the same space as the group of three. Accommodation, coexistence and cooperation are all things children do well---and we should give them their due credit.


Thursday, March 10, 2011

VERTICLE TUBES IN A BOX - EXPLORATION

If you give children holes that they can pour stuff into, they will do so with absolutely no prompting.


To do that with this apparatus, though, a child first has to scoop the sand from the table .  In the process, he is developing large muscle skills to coordinate reaching down, scooping and lifting up.  And since he really wants to get it in the hole,  he is laying down the muscle memory to do it with some degree of accuracy.  When you add a little stool, as seen on the right, you are adding balance to the skills the child is working on.  Who says children don't work in an early childhood classroom?

For some children, it is at least a two-stage process.  First they scoop it into a container before they will pour it into a hole.


The video shows a very simple scheme, but some schemes get more involved with more steps.  And as they go through this process, you start see they have worked out a plan of what works for their purposes.


They will use scoops, cups, spoons  or whatever.  If children want to pour, they will make almost anything functional for that purpose.  They are true inventors.


They all pour differently, too. Some will pour with gusto and some will pour with great deliberation.  The act of pouring is so natural for children that it feels like a need.  By accommodating that need, they get to express themselves motorically, all the while working on their large and small muscle development.


Of course, if you put something in a hole, you HAVE to see where it goes.


With this apparatus, funnels foster even more play and exploration.


I always have funnels close at hand at the sensory table.  Some of them fit nicely over the holes of this apparatus. When a child pours sand into a funnel, what happens?  It no longer disappears immediately, but the narrowing of the funnel regulates the flow so it gradually disappears.


And if you look closely enough, it gradually disappears from the center.  With a coarser sand, the flow may stop altogether.  Then you have to figure out how to get it moving again.
Do you wiggle the funnel or do you poke something down the hole?


If you have a sand with a fine grain, you will not have to worry about the flow.  If fact, you can use a smaller funnel.  If you want, you can experiment with the flow of a smaller funnel into a larger funnel placed over two other funnels over one of the holes in the apparatus.  That's a whole lot of fun...nels!


Part of the exploration with this apparatus happens on one of the levels mentioned here.  The level in this case is the space under the apparatus.  Take a look.


There are a couple amazing things happening here.  One, the boy pouring the sand into the funnel knows it comes out at the bottom.  He pours it and then immediately squats down to watch the flow.  He seems to be fascinated by the stream of sand emptying through the bottom hole.  You have to understand that the sand flows in a stream because of how the funnel is positioned in the tube.  If the funnel is a little crooked in the tube, the sand will not flow in such a nice stream.  Instead, it will disperse as it hits the side of the tube.  Does he know that?  Has he experimented? Maybe his focus on the stream is a spacial thing: the narrow stream flows from the middle of the much larger hole at the bottom.  Maybe it is the pure enjoyment of observing an even stream of sand.   In any case, he is focused and quite purposeful.

The second amazing thing is that it does not bother him that another boy on the other side is inserting himself into the action.  Or from the reverse side, look how effortlessly the other boy places a second metal cup to catch the streaming sand. They know each other is present in the activity and both have made some decisions about their actions to accommodate the other.  This is not sharing. Two children are operating in the same space with different agendas.  This may not be so amazing if they were hard-and-fast friends in the classroom, but I would have to characterize this as a spontaneous encounter between  two children who play together only now and then.  I must say, they handled the activity with a grace many of us can envy.

Thursday, March 3, 2011

VERTICAL TUBES IN A BOX

Here is an apparatus that is characterized by the following dimensions.  The tubes are horizontal and closed and there are plenty of holes into which the children can pour. This apparatus also adds one obvious level of play: the top of the apparatus.


If you look closely, you will also find a couple of other levels.  There is the floor, which is the same as the bottom of the grey plastic container into which sand drops out of the tube. This arrangement of the tube over the edge of the table expands the area of play around the table, adds another physical level of play, and offers an interesting spacial arrangement that is attractive and allows for a different view of the sand as drops out of the tube.


A second level that is not so obvious is the level created by the tray that supports one end of the apparatus.  And the level created by the tray adds at least two more spaces to explore: the bottom of the tray itself and the space under the tray.  And if you really want to parse the spaces, there is a space formed by the area under box over the tray.


This apparatus was made with a long, narrow box and six tubes of various sizes. One tube was a clear and rippled, four were pvc pipes of two different diameters, and one was a cardboard tube.  I did not cut any of them for this apparatus.  I used them as is.  The two longer tubes were placed on the ends of the box so they could be placed over the end of the table.  The four others were placed in the middle.


I traced the the tubes on top of the box and cut out the circle with a utility knife.  I flipped the box over and repeated the same tracing and cutting.  I inserted the tubes into the box.  The two longer tubes were inserted so only one end extended beyond the box.  I then duct taped the tubes both on the top and on the bottom so they would not move.


As you can see, some of the tubes are flush with the top and some are not.  The two end tubes extend downward out of the box.  The picture above shows the setup from this year.  The box is reversed from the previous year's setup; the long white tube is now the one that extends outside the table.  And there is no tray in this variation.  That was not planned.  I thought the apparatus extended over both ends of the table.  It did not, but I had left the tray at home.  When I wanted to set it up, I had to improvise with something I had at school.  (I find myself doing that a lot---improvising, that is.)  One of the first things I found looked like a little ladder.  It fit across the table so I taped it onto the table and then the box onto it.   I fully intended to bring a tray the next day, but the ladder support introduced an airy space providing the children with a new area to explore over, under, around, and through.

Here is another version of the apparatus that actually extends beyond both ends of the table.  This was easier to attach because all I had to do was to make notches in the box on each end and set the box over the ends of the table.  The bottom of the box sits above the bottom of the table so the material can empty out of the tubes. Notice, though, that this configuration does not have the tubes that empty into a container outside of the table.


One further difference is that the space between the bottom of the box and the bottom of the table is quite a bit narrower than the one pictured first in this blog entry.  That is ok, it just means the children will figure out how to work in a different-sized space.  That is a challenge they are always up to.

It's all about spaces, levels of play, and holes.